"Paving in a garden is a rewarding extravagance." Russel Page, The Education of a Gardener
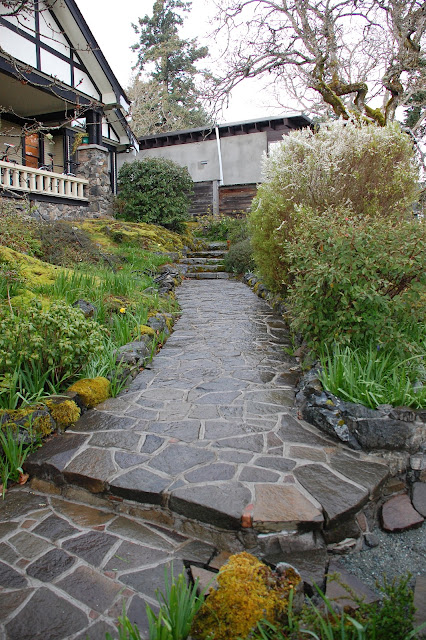 |
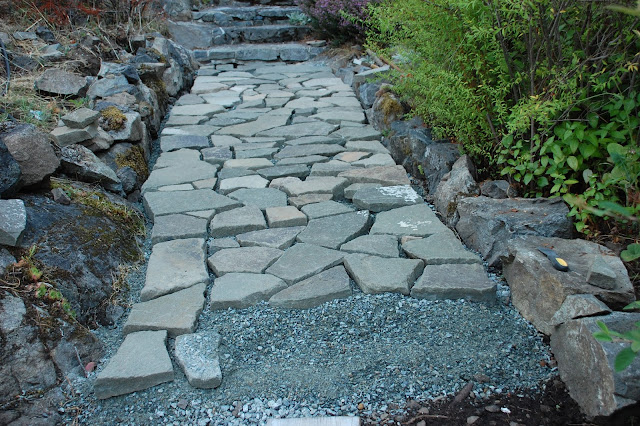
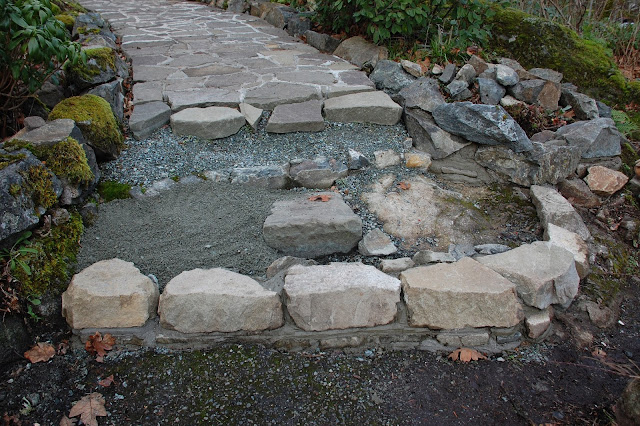
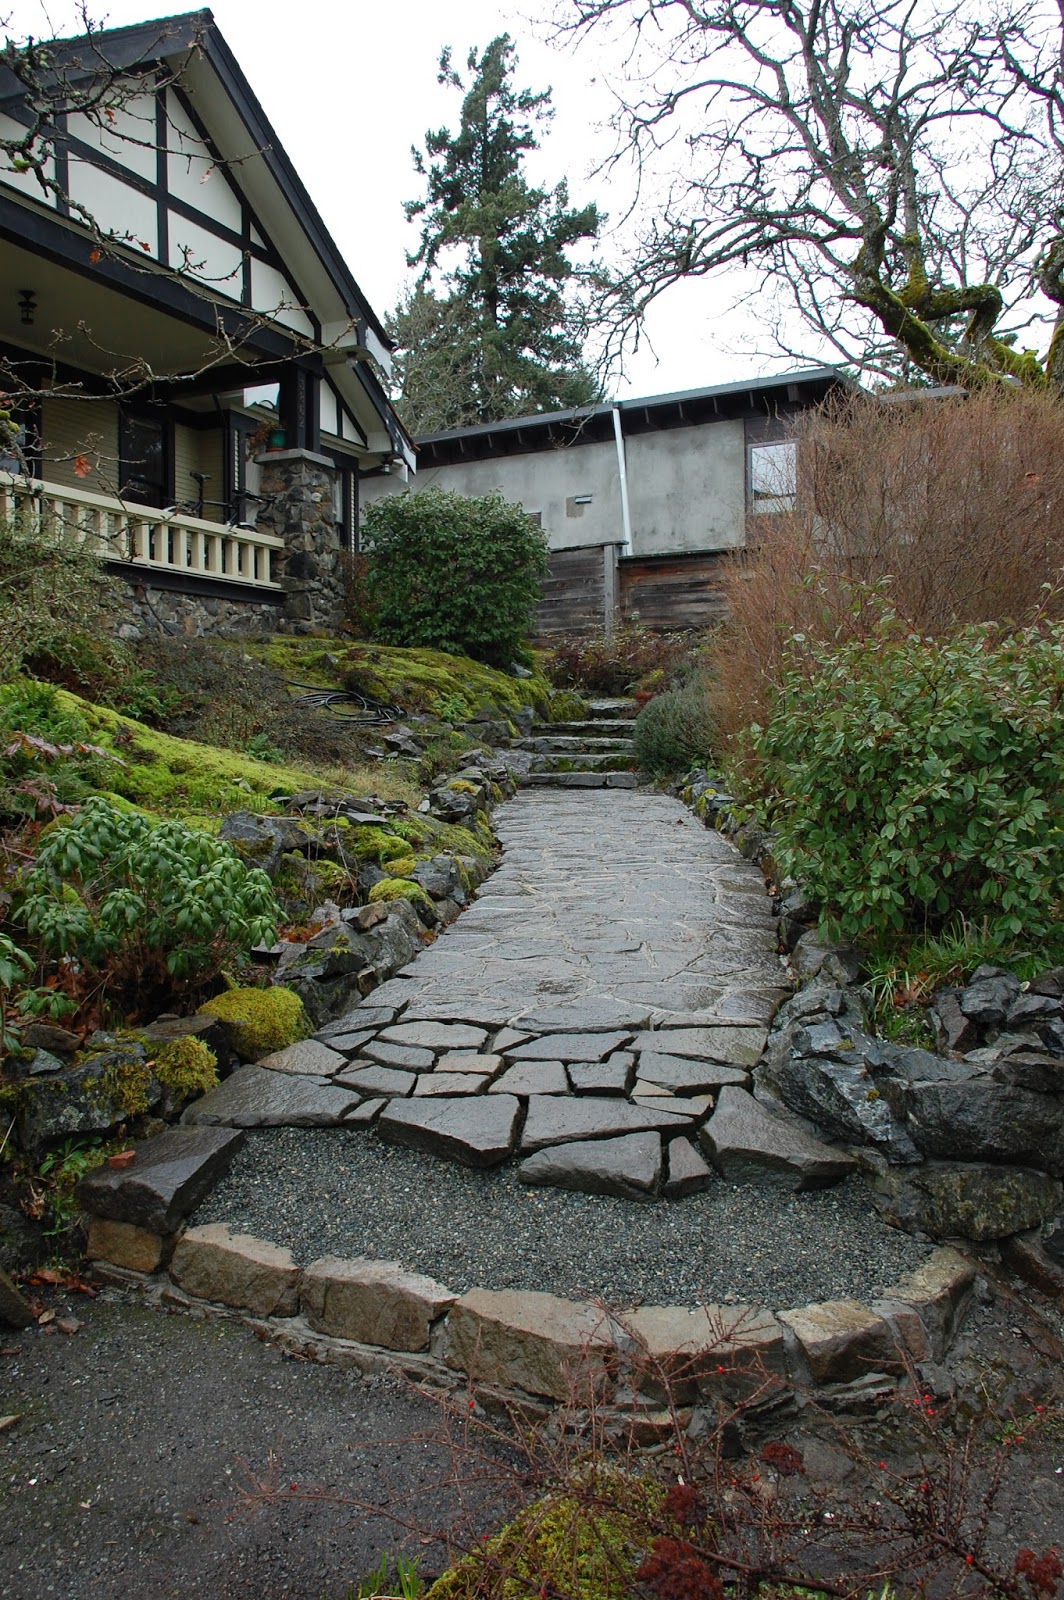
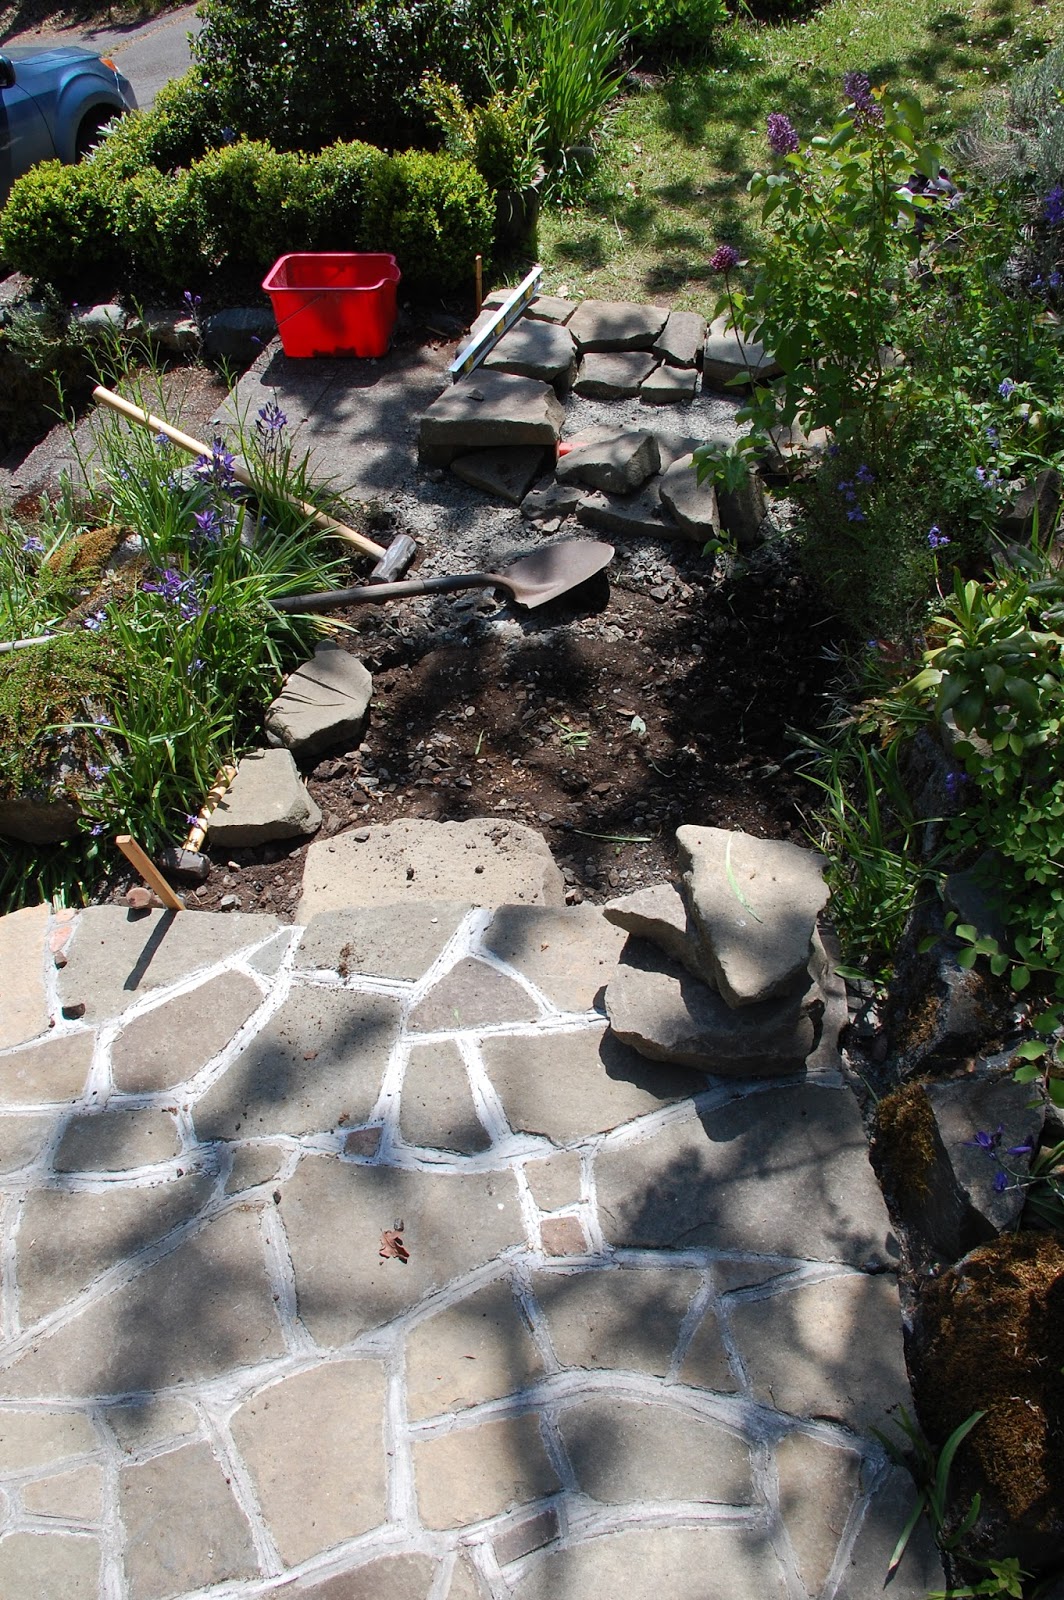
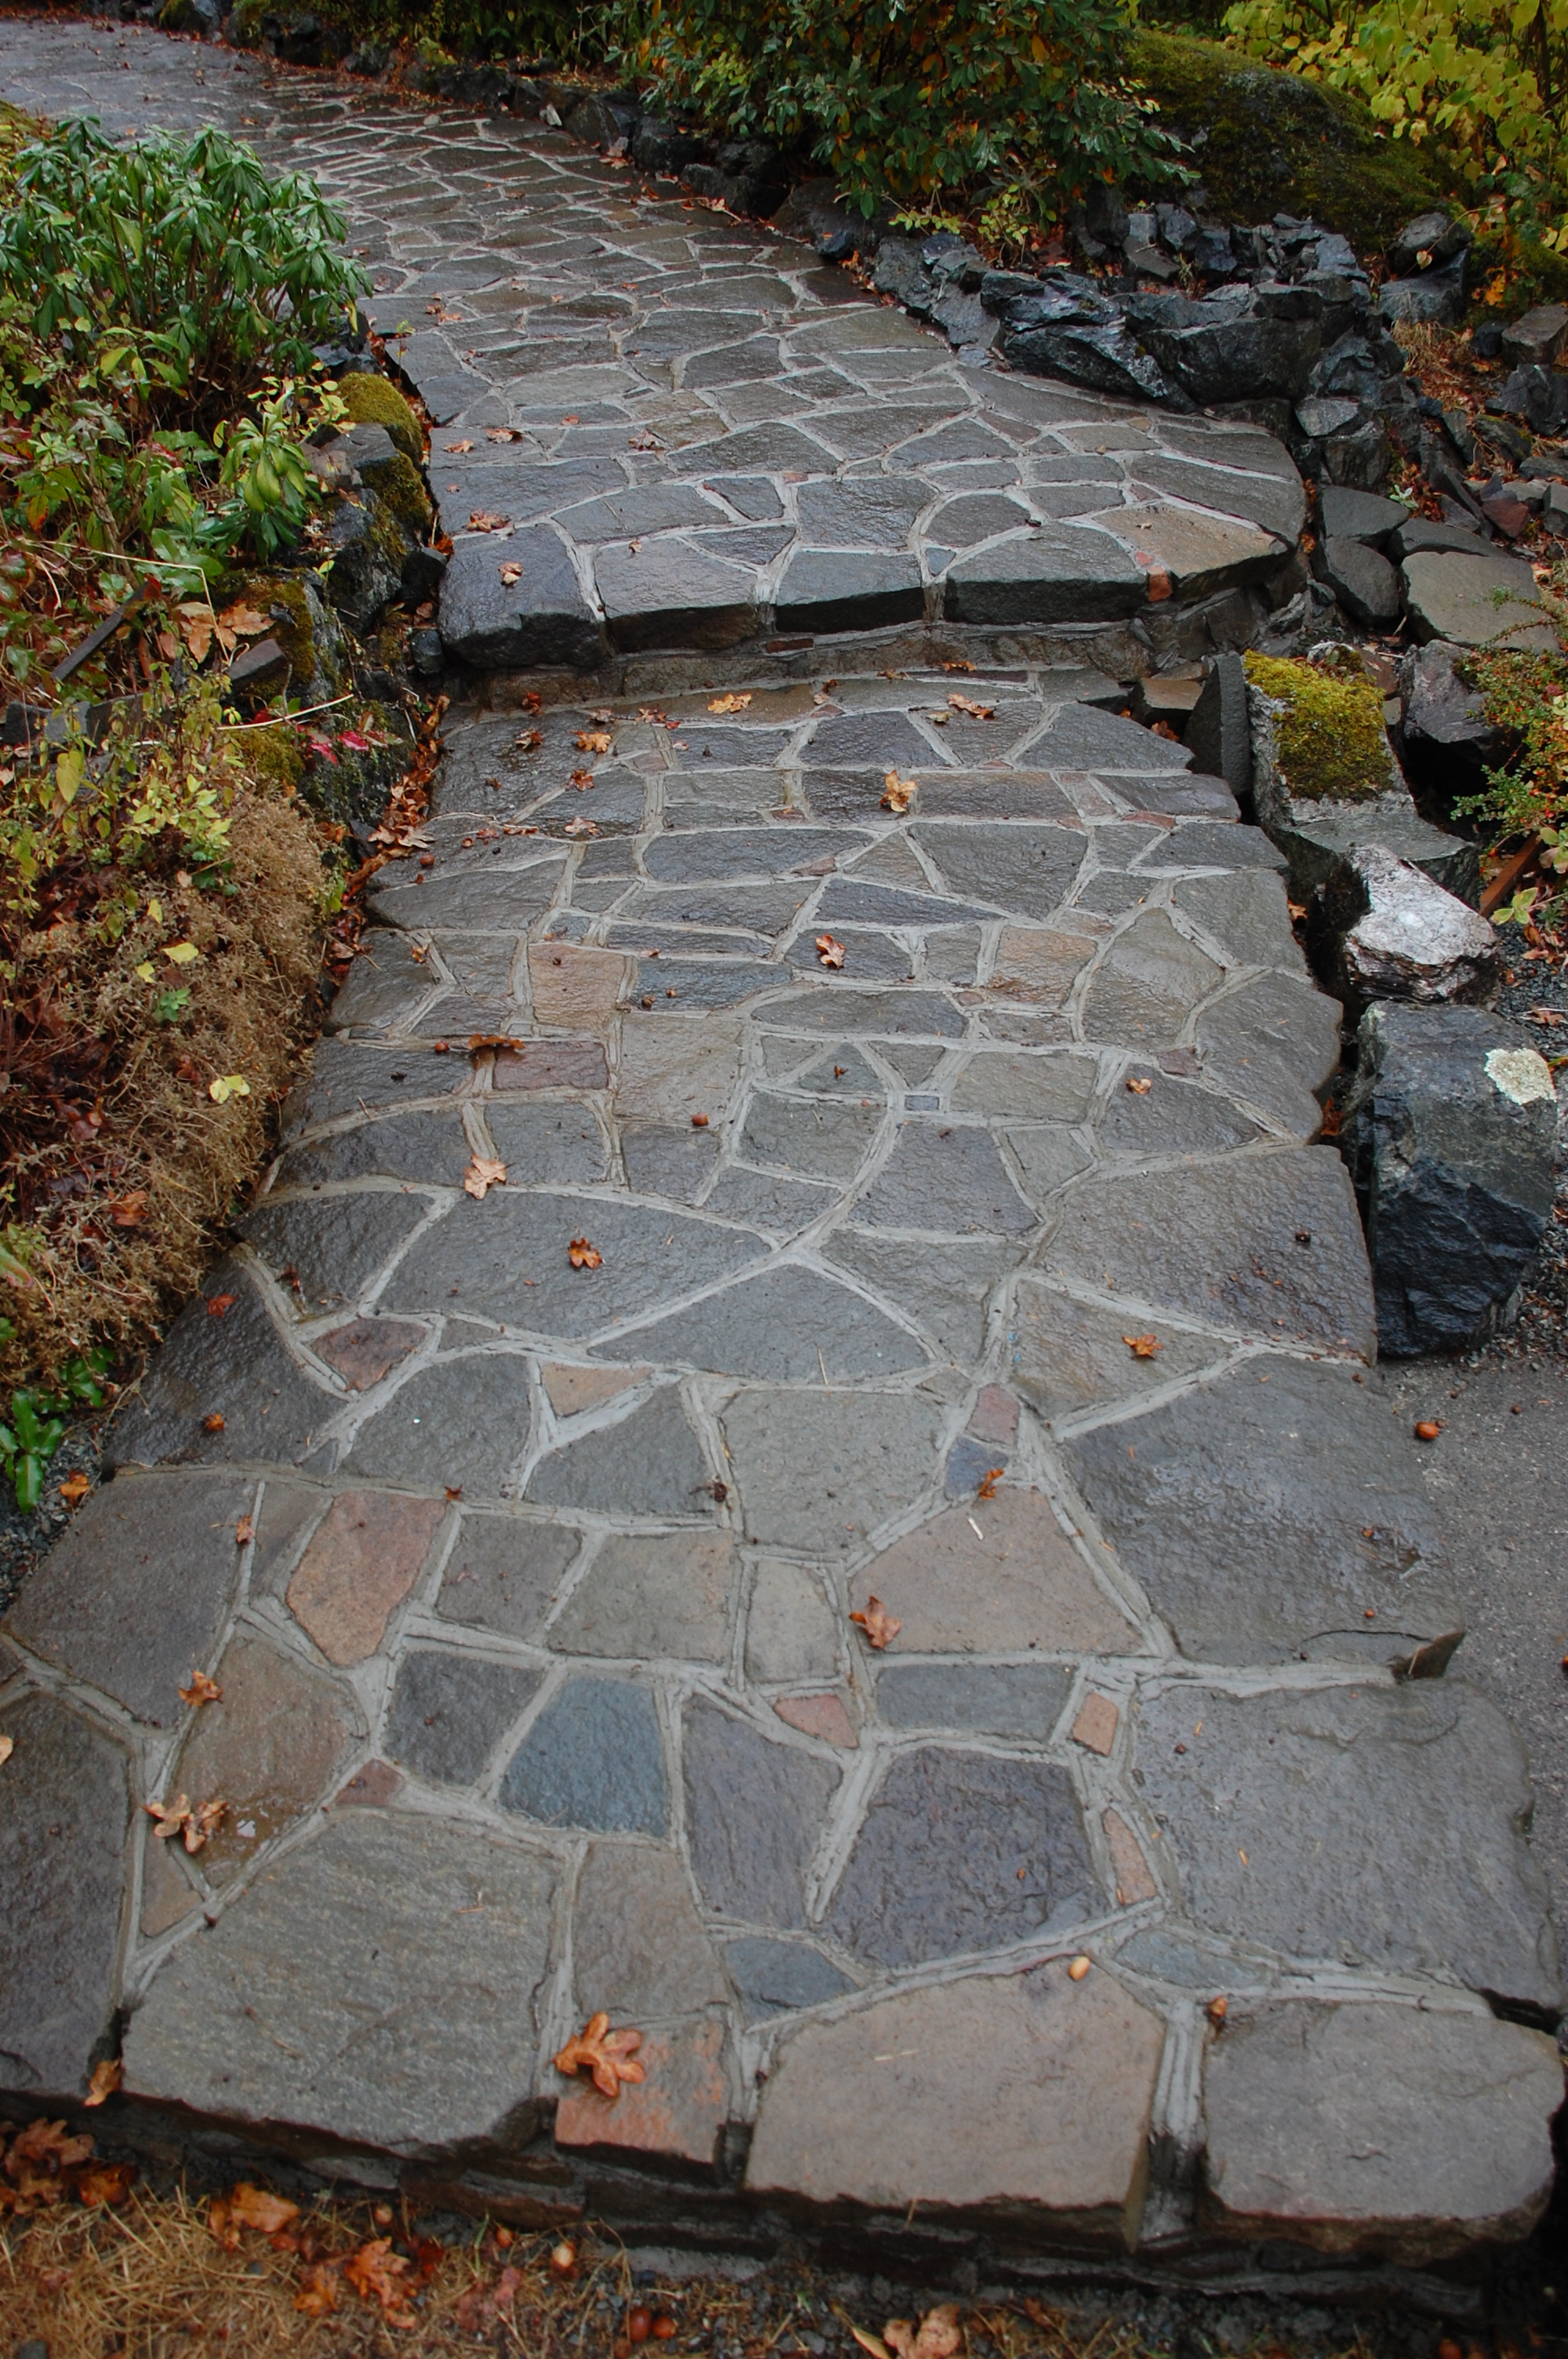
April 2013, new waterfall step and landing
|
 |
Asphalt surface in 1988, long before I had any thoughts of repaving
|
The job of remaking the path to the front door was unavoidable in the end, but many years passed before I was ready to tackle the huge project.
Partly I delayed starting because I didn't know how to go about replacing it (picture above, in 1988). Asphalt to stone was my intuitive choice, but which stone, from where, and how laid to good effect?
Over two decades of exposure to small-scale stone-work projects would elapse before I could start on the path. Ultimately though, that old walkway had to come out, its asphalt veneer
wearing thin after long use and constant weathering. And, in fact, it had been rather hastily contrived - perhaps as an expedient when the
original holding was first subdivided - and consequently it was brought off without much attention to detail.
My conundrum was how to go about making a definitive change for the better. Complicating matters, I realized the surface would need to remain in service if we were to continue accessing the front door. There wasn't another workable option during a rebuild I was certain would take me a while, so there needed to be a way of constructing a replacement without having to take the existing path fully out of service. Considerations like these stumped me for years. Then unexpectedly, in 2010, I chanced on a source of irregularly shaped, flattish sandstone, a discovery that would set me on a very fruitful learning curve. Initially I was preoccupied with gathering enough stone to manage the entire project, a calculation based more on gut feeling than real experience (I am an amateur rather than a trained stone mason). I also wanted to ensure my new path felt more like a unified whole than the asphalt afterthought that came with the place. This
mattered to me because of the Arts-and-Crafts thinking behind the
1913 house the paving accesses. Overall, its alignment needed little tweaking, as it had been very carefully fitted to the site's natural contours. But the materials and finished dimensions of the replacement surface were other matters entirely.
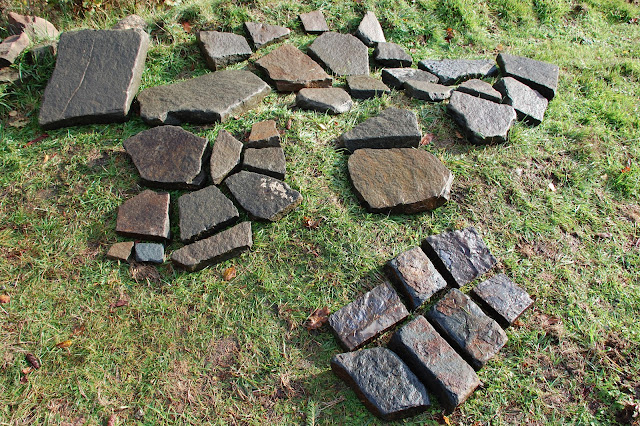 |
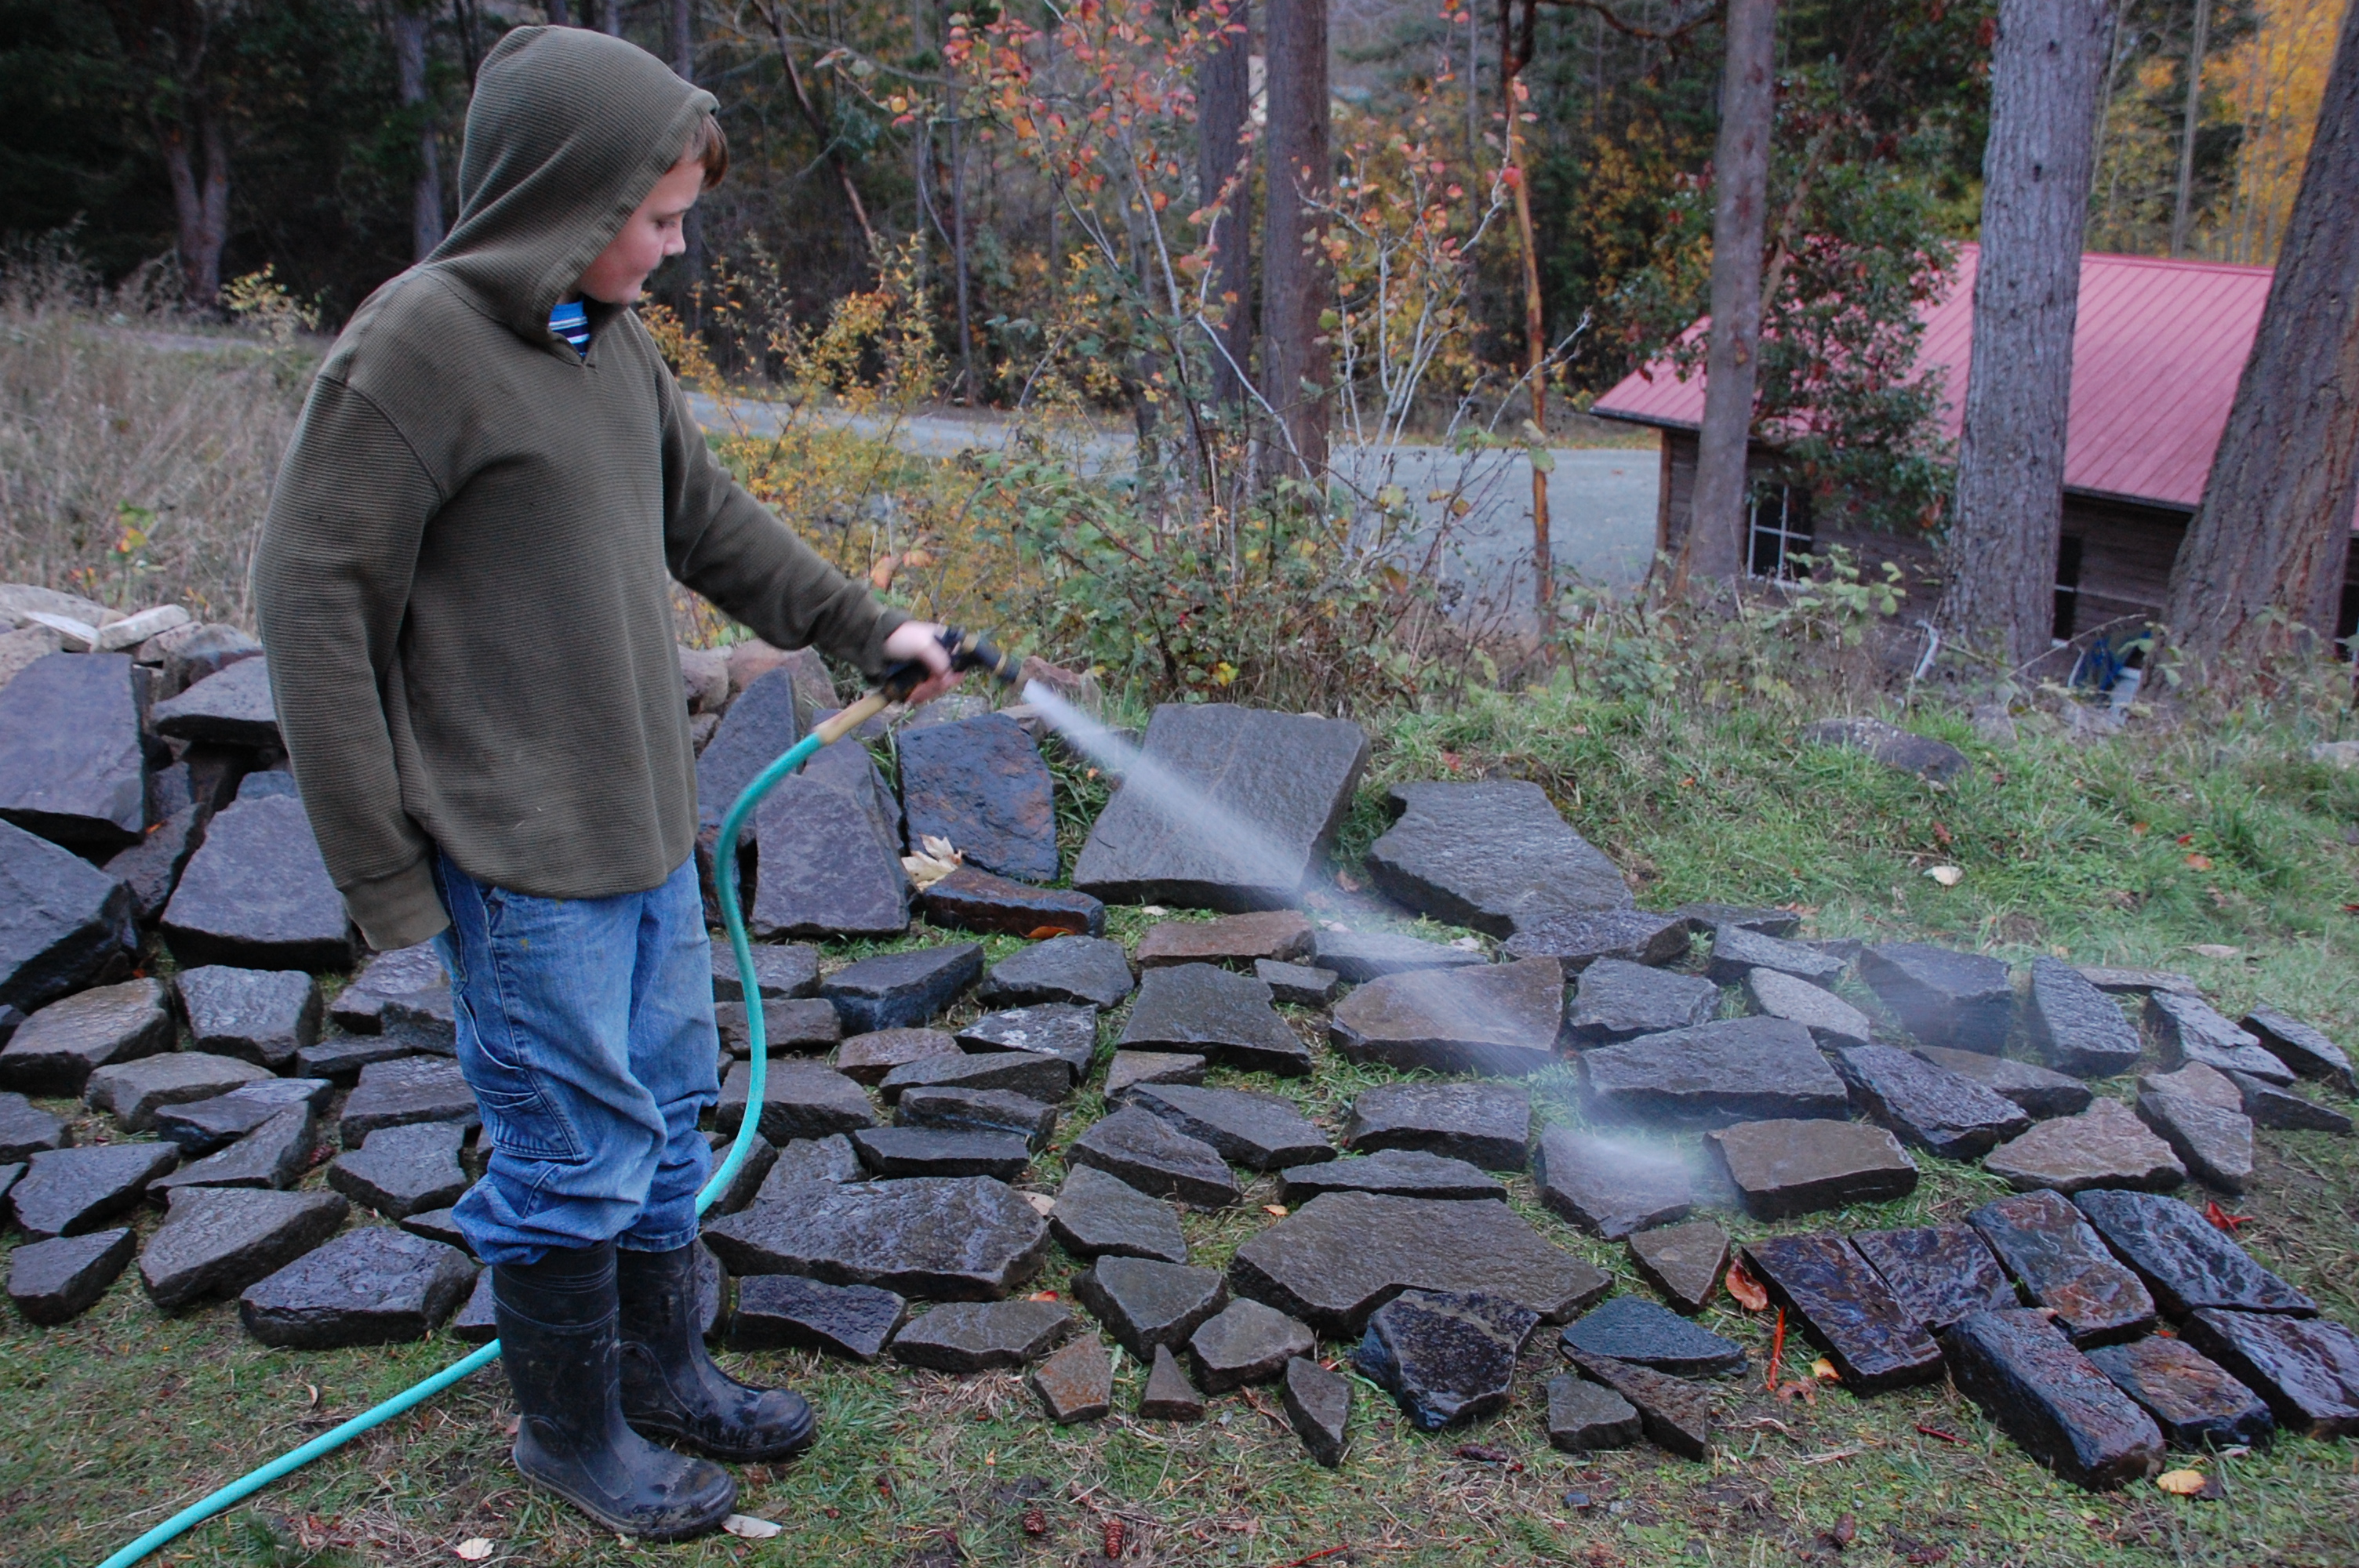
Raw materials for paving, newly washed and hence colour-saturated
|
I gathered my sandstone at a family getaway on Pender Island, collecting it from the many small openings enabling driveways or new outbuildings in the immediate vicinity. The pieces I chose were sufficiently flat to function as rustic pavers. Over time, I supplemented this stockpile with pickings from a nearby rock quarry. I recall being impressed that my trove of stone was all-of-a-kind rather than a jumble of materials collected from far and wide. Gulf Island sandstone is a bedded stone that's laid down by annual deposits of granular sediment at an ancient river delta, then subjected to sufficient pressure over eons to harden into stone. Because it is a form of bedded stone, it tends to fracture into flattish chunks of irregular shape - which was perfect for my intended use. I soon fell under the spell of its subtle colour variations (bluish greys, salmony pinks, brownish-golds, mostly tending towards a blue-green coloured when weathered). I also found it fascinating how dramatically these colours intensified whenever the stones were wet.
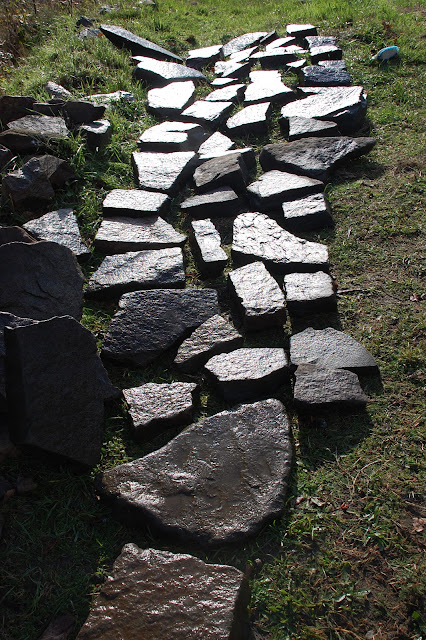 |
Washed stones glisten in the winter light
|
With sufficient stone in hand, the next obstacle was my lack of experience working with sandstone. True, I had already repaired a flight of stone steps linking the asphalt path to an elegant verandah (including fashioning an entirely new step as a base to reduce the height involved) but this work was done with Victoria's underlying bedrock, in order to be consistent with the existing steps. Ultimately, Victoria bedrock is much harder than sandstone and is not created by deposition, so it is far less prone to splitting into flattish slabs. And a few years before I had also built a circular stone patio in the rear garden (photo below) from of an eclectic mix of materials. But again, none of it was sandstone.
 |
Circular stone patio that creates a sense of being an outdoor garden room
|
Given that this path is our principal approach to the house, it felt like a lot was riding on the outcome. So, lacking direct experience, I was determined to acquire some before embarking on the big job. I saw this project as my chance to create something to address
the more glaring defects of the asphalt path - not least, its baldly utilitarian
quality. Asphalt is not (to my eye at least) an adequate paving choice for a self-regarding path - especially not one integral to the landscape at an Arts-and-Crafts house. Asphalt
as a building material doesn't impart a distinct sense of place, nor does it make a memorable
impression in use. And as currently contrived, the path barely enabled the essential movements of people and goods. It was, for example, too narrow at points to function optimally. So I wanted to replace it with something of greater bearing, which to me meant loftier treatment, in worthier materials. Also, I was determined to add some beauty to the alignment's overall utility by emphasizing the quality of the materials I used to fabricate the path. Looking back on this more than a decade later, these aspirations did set the bar quite high, so it was no wonder I felt considerable pressure to make it look good!
 |
Gathering suitable slabs from the shot rock at a nearby quarry
|
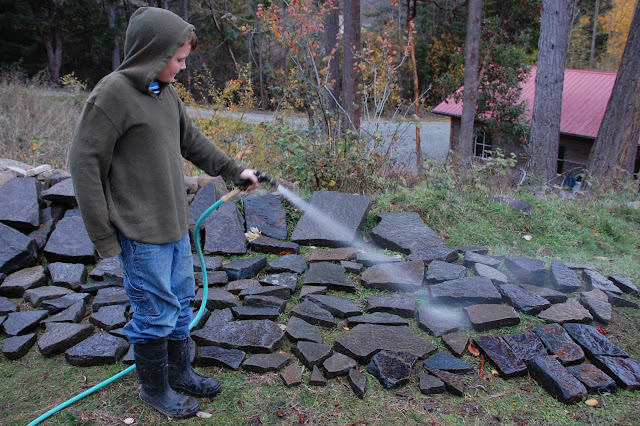 |
| Bryn washing quarry muck from the newly collected paving stones |
To this point I lacked confidence I could develop an optimal design for the entire length of the path, especially not while working through sequences of short bouts. The alchemist's trick here would be turning the output of many separate bouts into a convincing unified whole. Really, I had little to go on at this point, no tested rules of thumb
to guide me in layout and design - not much more than my resolve not to screw things
up. While the patio project had taught me the rudiments of placing flattish stones of varying sizes together, overall that project lacked the sense of cohesion I wanted for the new path. Accordingly, I felt my approach to arranging random shapes into convincing patterns needed more consolidation. So, having a strip of fairly level ground available near my expanding cache of stone, I decided to lay out a sample run of 'imaginary' paving in order to develop direction. I prepared the ground for this exercise by top-dressing it with a thin base of aggregate and rock dust (known in these parts as 'road base') which served to even out coarse irregularities of level and provide me with a stable surface to experiment on. This setup allowed me to play around with placement without any finality riding on the outcome, which became the opportunity to learn by way of progressive refinement of layout. I soon found myself looking forward to the next session of this layout-play. It served as a practical way of getting to know sandstone better, learning its characteristics and subtleties by working with it more. I was intrigued by the fact that manipulating the placement of individual pieces held out the possibility of intensifying the overall aesthetic effect. In this genre of work, combinations do count. This perception led me to explore the visual impact of aligning different edges with one another (some are curved, some relatively straight, most are irregular, while some can be modified with hammer and chisel). Often this meant simply rotating them in place in order to canvass the options, but it could also mean trying out entirely different combinations to improve the overall effect. As I gained experience working with these new materials, I became more invested in the emerging method's results. In
fact, looking back on that process, I am still fond of the imaginary pathway it led me to lay out. At the time, I toyed with hauling entire segments back to town intact,
on the improbable theory that what had worked in one locale could simply be transferred to another. One attempt at this disabused me of the idea - literal transfer of previously laid-out segments wasn't ever going to produce the path I wanted on Grange Road (differences of width and lay of land militate against it, among other factors). But looking back on it now, I really did enjoy the process of refining that trial path and, as the pictures below attest, the process of laying it out suggested a viable method of composing more convincing wholes - primarily by arranging the stones to feel comfortable sitting beside one another. It also convinced me that achieving a tighter, more uniform fit among the random shapes had a definite value in helping fuse them into a cohesive whole: edges echoing adjacent edges, as much as possible, in order to better establish a sense of ensemble. You can gauge my early progress in these new techniques from the next few shots.
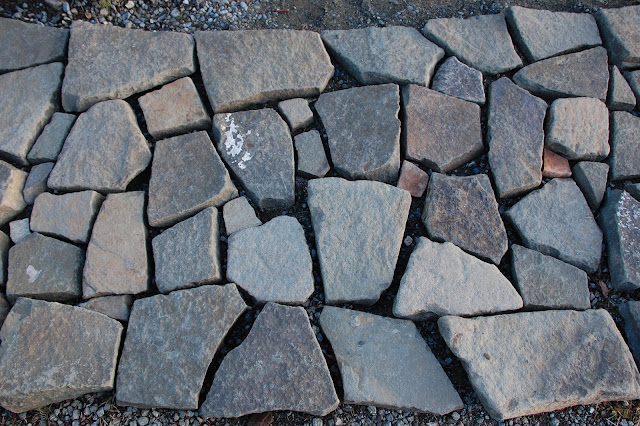 |
Small points of stone enable transitions between the larger slabs
|
 |
| Edges echoing edges, so far as possible, without undue trimming | |
|
|
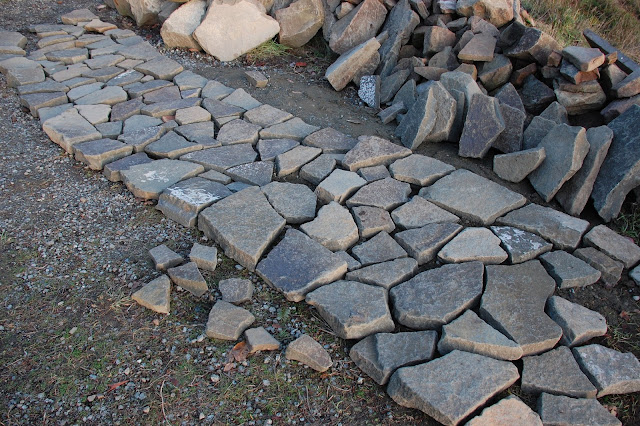 |
Learning to place stones so they feel comfortable beside one another
|
This experiment continued over many
weekends, spaced out over perhaps six months. As I refined my approach to layout, I came to realize that adding more base material beneath the stones enabled a process of finer levelling, which in turn more closely approximated the finished look a given cluster will have. Gulf Island sandstone tends to split irregularly when fractured (some of the pieces are only level-flat on only a single face). I first tried using sand for this process of fine levelling (there was some ready to hand) but ultimately rejected it as being too unstable for my purpose. Then I recalled having discovered crusher fines as a basing material during the patio project (crusher fines, aka three-eighths-minus, is basically a mix of rock dust and stone chips that are less than three-eighths of an inch across). Recollecting this use was a boon, as it remains my go-to base for both initial positioning and fine levelling of stones. A secondary process of fine levelling enables a more-flush alignment of the presentation faces of the stones, approximating more closely the look a given arrangement will have when mortared-in. This step brings the overall composition into
sharper focus, while offering some hints about where added shaping of particular stones would benefit appearances (this process involves lopping irregularities off with a hammer and chisel, which in a soft stone involves some risk of damage). Additional levelling-up also reliably exposes the true size of residual gaps between larger pieces, in turn suggesting where further tightening at points is needed. These gaps don't show as markedly in initial layout. All this led me to realize that a
distinct step towards tightened placement was simply good practice: a way of making the layout clearer that added emphasis to the finished look. This approach enables a smarter and more formal appearance in the outcome. For me, this was an important insight when the main event finally got going.
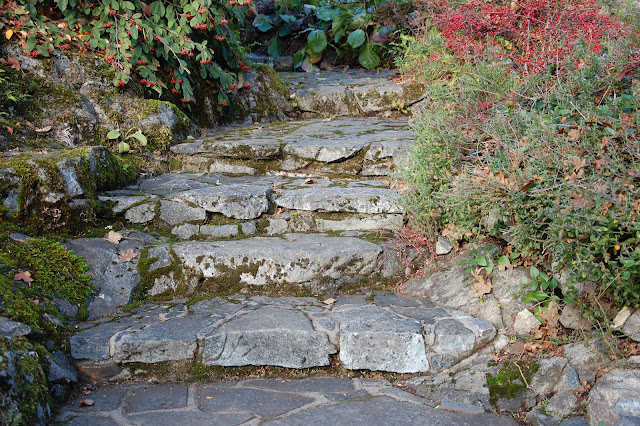 |
The lower step was added earlier to reduce an undue climb from the path
|
While I was learning from experimenting with sandstone layouts, I was also researching some approaches to
path making in garden traditions other than the British one I'd inherited - foremost, the many ways the Japanese have of composing distinctive stone pavements. Japan hosts what is likely the most-evolved tradition of path-making among all the gardening nations, perhaps due to its remarkable access to so many different types of stone. Some of this stone is a by-product of natural processes, such as gravity and wave action, but some is due to more deliberate shaping by man, which the Japanese do and deploy in striking ways. One precept I drew from looking at Japanese models involves the use of substantial chunks of stone at the edges of the path. This practice has a big impact, imparting a feeling of solidity and heft to the path. And, it also allows the edges to serve as a container for a potentially engaging flow of stones within, potentially reinforcing movement. This technique of using larger stones as edging while framing arrangements of other pieces within results in outcomes that simply feel right to the eye. Practice at working irregularly shaped sandstone chunks into compositions that hold together visually also prompted me to adopt the idea of using smaller fragments (or points) of stone to fill some of the larger gaps between major pieces. I tend to prefer naturally occurring, quasi-geometric shapes for this use: triangles,
squares, oblongs, even trapezoids, and so on. When it works, this method of filling openings amplifies the sense of congruity among the principal stones. However, experience has shown there to be a fine line between using such markers to reduce gaps and over-relying on them to the extent of making the composition feel busy. My feeling now is that the right balance is best achieved intuitively during layout, by aiming for general restraint and an overall feeling of repose.
"Until you can feel, and keenly feel, that stones have character, that stones have tones and values, the whole artistic meaning of a Japanese garden cannot be revealed to you. In the foreigner, no matter how artistic he may be, this feeling needs to be cultivated by study." In a Japanese Garden, Lafcadio Hearn, Atlantic Magazine, 1892
At some point it also became clear to me that orienting the stones across the direction of the path (i.e. setting them horizontal to the actual movement) lessens feelings of forward thrust, resulting in a more-relaxed
composition and user experience. The converse is also true - so for my purposes was to be
avoided - i.e., that setting stone in the direction of the path's movement speeds things up, hurrying both eye and body along the extent. My new path was intended to provide an experience to be enjoyed en route, not one to be hurried through. Further romancing of these experiments in layout follows pictorially.
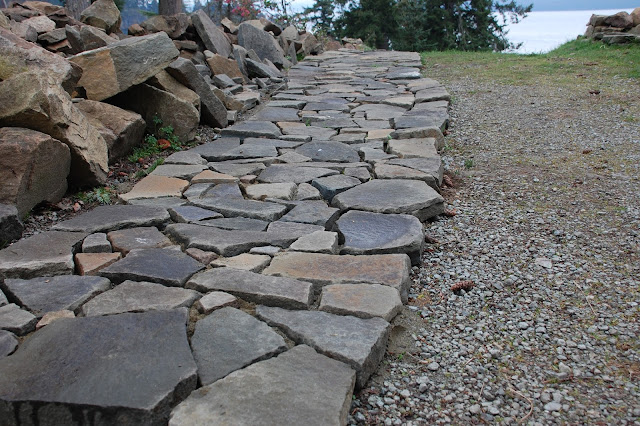 |
Levelling-up the stones offers a truer glimpse of final appearances
|
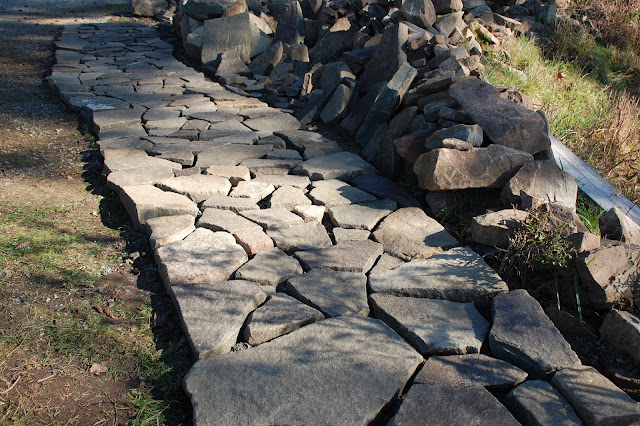 |
Finer levelling reveals the true size of the gaps between the stones
|
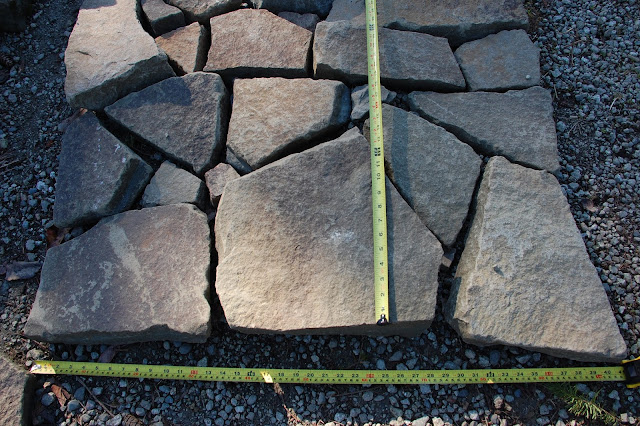 |
Literal transfer doesn't make for a pathway that fits elsewhere
|
At some point I realized I needed to take a leap of faith and just embark on the main project, so I began hauling stone to the site. Shortly afterwards, I started laying the new path out in earnest. This entailed accepting that I could not have a complete impression before mortaring sections in place. Somehow I needed the confidence that I could knit things into a unity as the project unfolded in real time. At first this seemed a stretch, but in the end it simply meant accepting the uncertainty and getting on with the knitting. Just knowing there was sufficient material to finish the path consistently ultimately helped me believe I could achieve a unified outcome despite working piecemeal. So, one day I just dove into the project. I began by tearing a section of the existing asphalt out, about seventeen feet long from the base of the steps. Next I excavated and removed the underpinnings - meaning suddenly there were oodles of material to manage as first asphalt, then coarse
gravel and sand, came out, and a layer of road base topped with three or four inches of crusher fines went back in. Once the new base material is fully compacted, the paving stones rest on a stable platform that will withstand temporary use without having to be mortared in place. Once compacted, the layer of crusher fines sets up a sound base for mortaring stones in our moderate, wet climate.
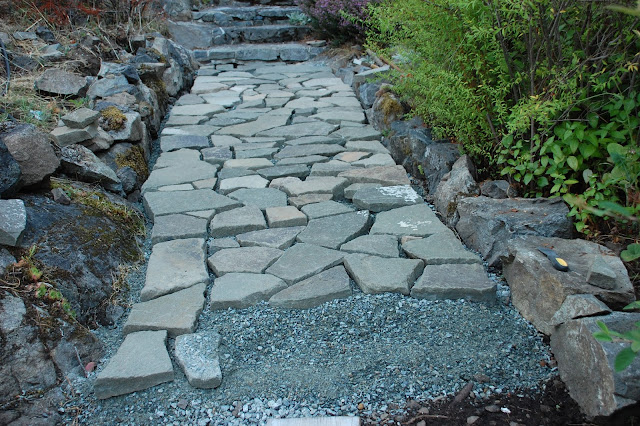 |
Levelling up the layout on a base topped with compacted crusher fines
|
There was no going back once I'd taken the plunge. Fortunately, life contrived to hand me some disposable time, which was just what the project needed. The photo above is an early look at the emerging path, with fine levelling yet to come. You can see how the inside edge wanders along the rocky outcrop in rough conformity to its contour. Placing these first stones alongside their neighbours developed expectations about the potential to evolve a convincing sequence of shapes on the land. Designing went on for a considerable time while I consolidated an approach to the new materials. For one thing, it became clear that daily comings-and-goings over the un-mortared paving stones effectively pre-loaded the base layer (pre-loading occurs when the base material compacts to the point where there is virtually zero potential for it to contract further). And because this project was not done professionally (a process where time does in fact equal money) but rather as a labour-of-love and for the intrinsic satisfaction, I could allow things to just unfold while focusing on refining the layout. Once I got the initial section to a point where I was satisfied with the design, the next challenge was finding a way to keep the path operational while mortaring stone in place. Here I landed on the notion of only working on half the width at any given time - a simple but effective solution, if necessitating some fussing in order to ensure prior and new work felt seamless. This approach allowed the newly mortared sections to be sequestered from use, affording them time to set up and harden. Use of temporary barriers as visual cues helped people steer clear of work that was still drying. And fortunately, my family were the principal users, so they readily acclimatized to my slow-motion paving routine. I think the method adopted (i.e. working on a half-width at a time) has a certain elegance to it - although only someone with the privilege of doing this work as an undertaking rather than as a job could indulge himself in this way. Yet effectively,
there was no other choice at our house - the path to the front door simply had to stay in use!
 |
Spring shows the new path extending itself
|
|
Considerations of utility also played a role in shaping the path. While the existing alignment had been fitted deftly into the site's natural contours (credit to Hubert and Alys, the original designers who allowed the path to follow the line of least resistance) it did need widening where the asphalt iteration pinched unacceptably. I wanted to ensure there was sufficient width for people to be able to pass by each other comfortably. This is both appropriate on an entry path where it inevitably happens, and also better accommodates the goods and appliances moving to and from the house (many of which are bulky and often enter suburban buildings via the front door).
 |
Width is needed to accommodate easy passage
|
Other factors needed considering too as things were taking shape on the ground. As the path runs past the bedrock the house reposes on, the land rises sharply towards it (picture below). Whenever the path was remade in asphalt, relatively large chunks of rock had been used to form a rough wall to mark the rising landscape. But this had been as hastily contrived (and awkwardly realized) as the asphalt path itself.
 |
On the house side, the land contour rises sharply from the approach path
|
On the other side of the path, the contour flattens out into a bench comprised of humps of glaciated bedrock with narrow shrubbery beds. On the house side, in my opinion, the walled edge called out for a less-vertical rebuilding (a step that would also soften its effect considerably). I was also coming to feel that a matching low wall on the street side of the path would also have a positive effect, especially if done with symmetry of material type and size. The local stone I chose for these low walls mates well with the surrounding bedrock, as it's basically the same material. There was lots of this type of stone available onsite when I first arrived in 1988. But doing up both sides of the path consistently would mean collecting more of it than I had on hand (supplies were available in the immediate neighbourhood, left over from major highway-building projects along the capital approaches). Using local stone for the walls also contrasted pleasingly with the warmer
and flatter sandstone going into the path.
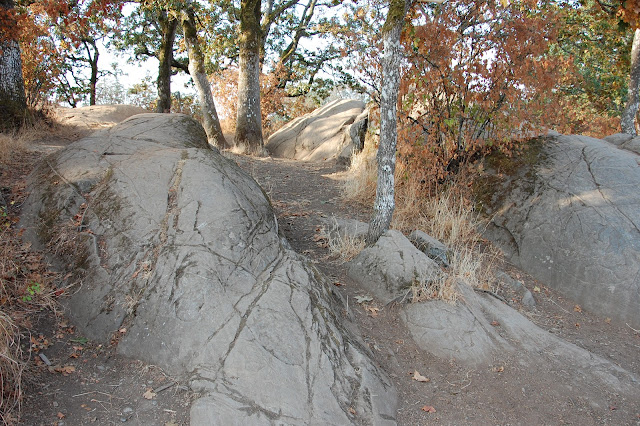 |
Glaciated bedrock bursting through the ground, evoking surfacing whales
|
Another aesthetic
idea gradually forming in my mind involved the analogy of a stream flowing across the hillside. As I'd learned from looking at pictures of Japanese examples, stone paths can be designed to emphasize the feeling of flow. In that vein, I'd already decided not to speed the downhill movement visually, electing instead to set my stones across the path's actual direction. But as my design progressed, I found myself wondering whether an impression of path-as-stream could be amplified by conscious shaping of other components. For one thing, if a path is styled to resemble the course of a stream, then low boundary walls on either side would stand for the stream's banks - a thought that reinforced the feeling that these should be of similar scale.
"Craftsmanship means dwelling on a task for a long time and going deeply into it, because you want to get it right." Matthew Crawford, Shop Class as Soulcraft
I also felt that stream-like motion would be reinforced if I reduced the path's incline modestly, which meant raising the bed by making a more formal step at the base of the main run. At this point in its trajectory, the land begins to descend increasingly sharply. The asphalt path addressed this geological fact by means of a half-step, breaking the grade slightly before accommodating a more rapid descent. This seemed to me a makeshift solution at best. So I found myself considering the impact of a better defined step, which would entail moving it further down the slope (which would in turn soften the gradient further). The
background idea of hinting at stream-like-flow ultimately proved fruitful, affecting both step-placement and the dynamic shape its curving lip ultimately took on. I wanted something that implied directional flow while mimicking, however distantly, the sudden drop of a waterfall. But
where exactly this full step would go, how to make it reinforce feelings of stream-like flow - those details remained to be worked out.
Complicating matters, this is also where the main path divides into separate channels, the more major leading to what eventually became a landing, the more minor veering off at a right angle, heading down the slope, then linking via a series of spaced descents to a woodland path. You can see the existing half-step's placement in the photo below, and the first glimpse of a possible shape for my waterfall-step.
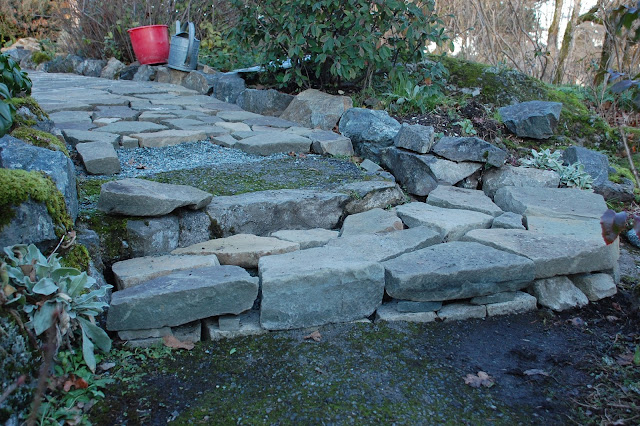 |
An early design for a step moved down slope, the old half step behind
|
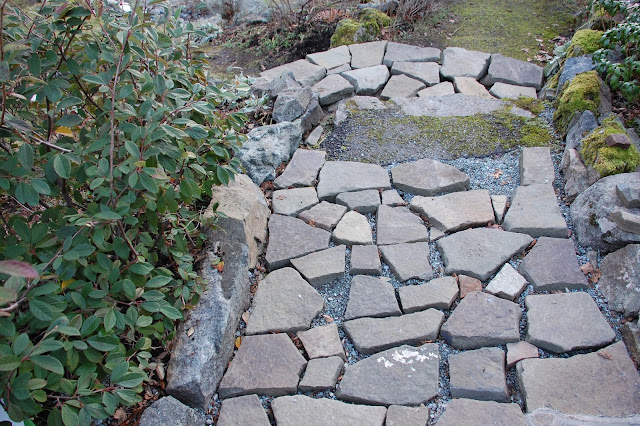 |
Shape of new step just emerging, amplifying the feeling of flowing water
|
Initially I was hoping to retain the
existing half-step to shore up the base under the new path, so I tried a layout on for size (see photos above). But it soon became clear that old makeshift step had to come out entirely. Also, it was apparent that a more distinct step up from what would one day become a landing was desirable for overall ease of access. An initial layout along these lines showed that the new direction did contribute to impressions of stream-like movement. And, best of all, the effort of prospectively laying out a potential top course helped me to find a flowing shape for the lip of the waterfall-step. Having the top course roughed-in in design (photo above) also helped me solidify placement of the base course beneath it! The next two photos show a more complete layout evolving.
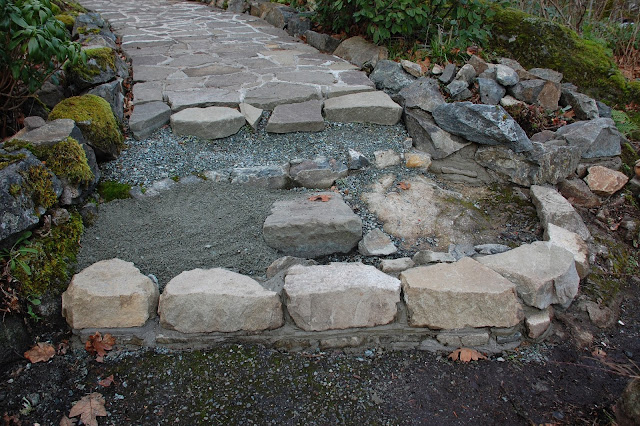 |
Old half-step now removed, new base course being mortared in place
|
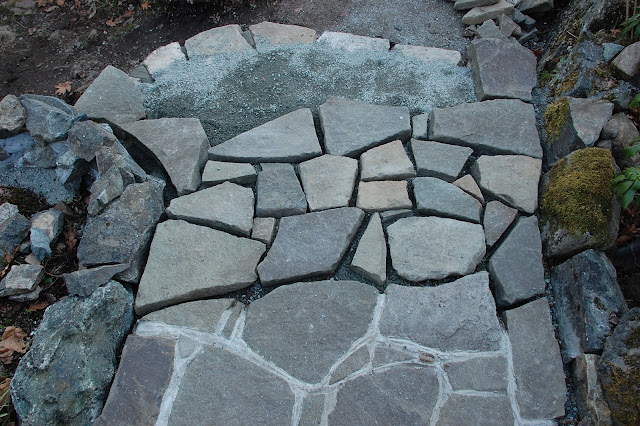 |
View of the dramatic turn to the left, overall styling of the step's lip
|
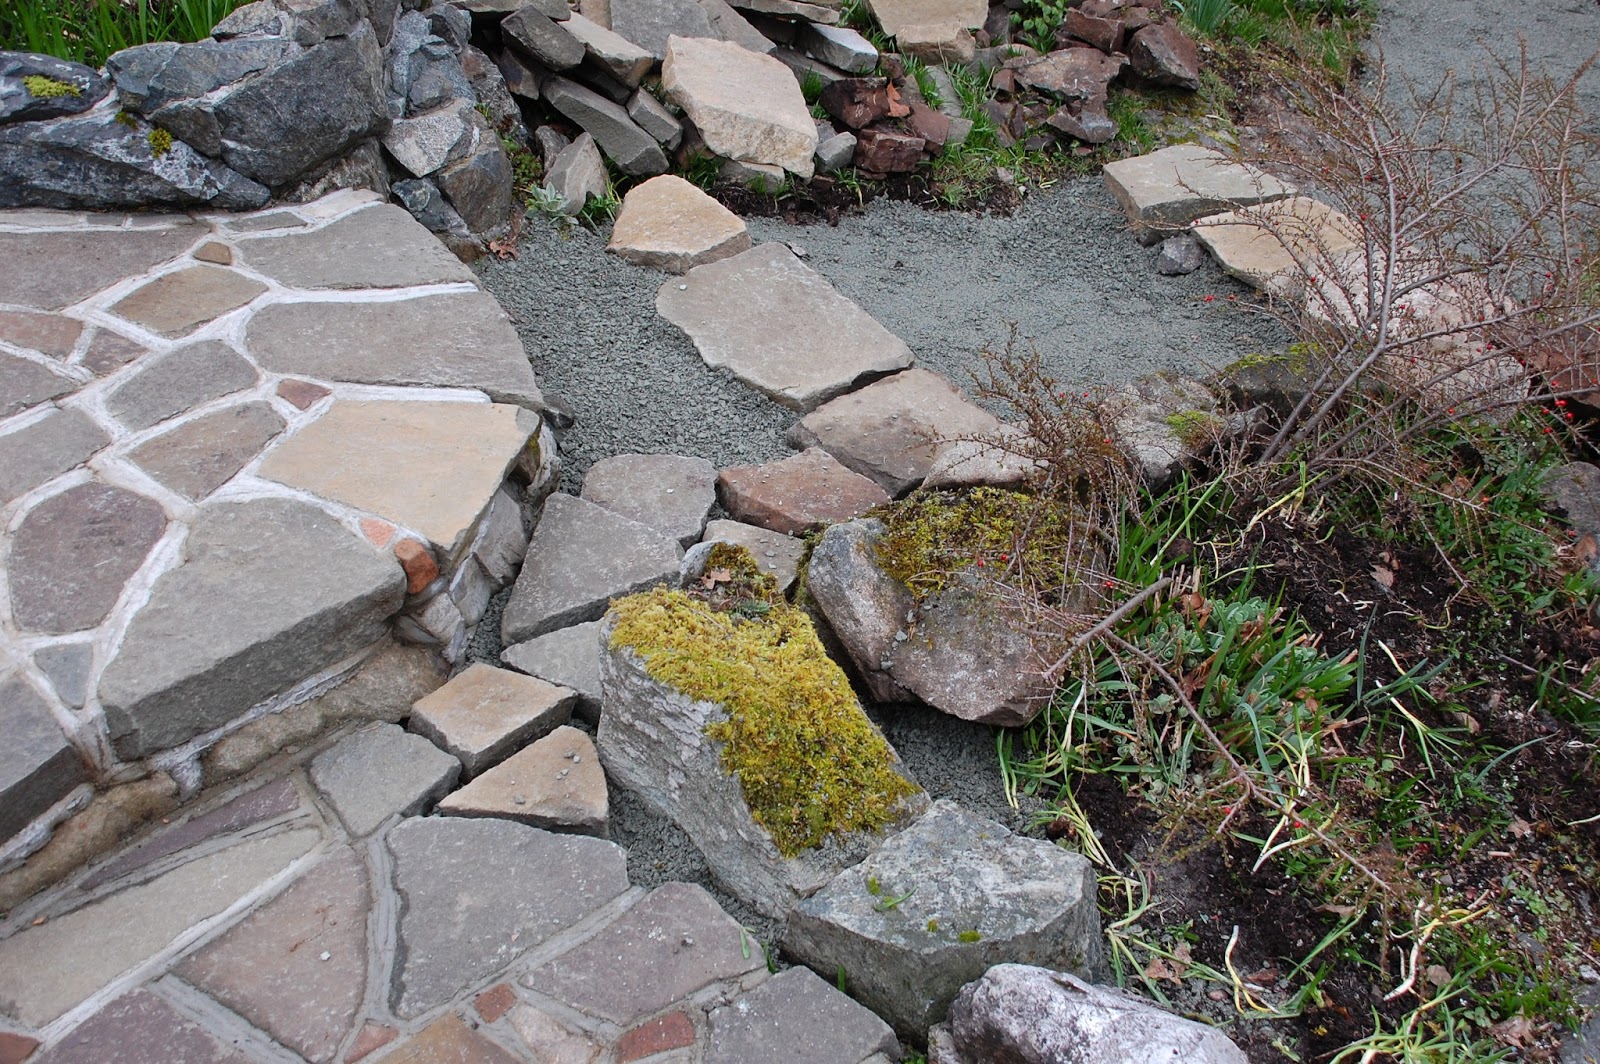
There was a lot of playing around with possibilities at this point. I wanted the layout to express free-flowing movement while retaining the feeling of being nestled into the land form. There's no inherent contradiction between these aims (streams cut channels naturally, so fit themselves into host landscapes seamlessly) but this double imperative (free flowing, yet built-in) made for plenty of tightening and refining of layout before any I got down to any mortaring. Once the base course under the path's curved lip was in place, it formed a crib that could be back-filled with compacted crusher fines and raised towards working grade. The step's base has an intriguing curve that implies forward movement as it curls past the emerging rockery bed (photo below).
 |
Base course now set, crib back-filled with fines
|
I also got caught up in shaping the rockery bed adjacent to the path (to the right, photo above) as an extension of the boundary wall. I wanted it to harmonize with the surrounding contours and nearby planting beds, so I continued to use native stone for continuity of form. I realized while working through this piece of the puzzle that rockery bed and stone path were actively defining each other. You
can see how I accommodated the diverging paths here, also just how co-defining bed and path are in the pictures
above and below. I took pleasure in knitting all these elements
together in design before finally fixing them in place with mortar.
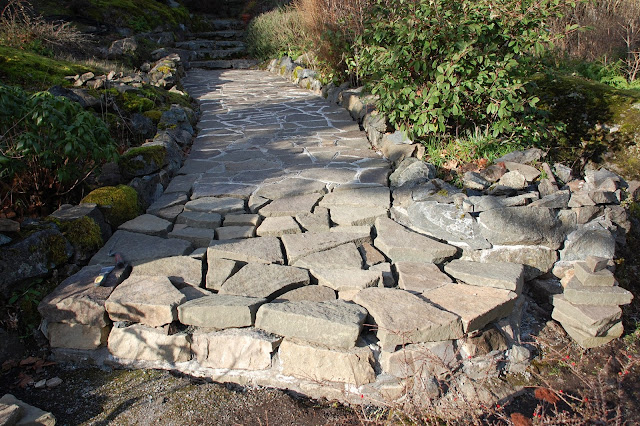 |
Lip of the emerging waterfall-step, curling past the new rockery bed
|
My approach to path-making involves focusing on a creative placement that enables the drawing out of patterns among stone shapes. This objective (discerning latent pattern among randomly shaped stones) benefits from my habit of experimenting with possibilities during layout. Experimentation nearly always produces better outcomes, if one is in a creative frame of mind that lends itself to the exploring of possibilities. This frame of mind, also known as a state of 'flow', is ideal for tapping creativity. Occupying a state of flow affords better outcomes the time and space they need to evolve fully. All that it means to inhabit such a state is that the maker's mind be fully engaged with the process at hand - in other words, one loses oneself inside the work to hand, with no competing awareness of time or any other obligations. Accordingly, one finds himself pleasurably enveloped by the job.
"When you find your place where you are, practice occurs, actualizing the fundamental point." Dogen, 12th century Zen master
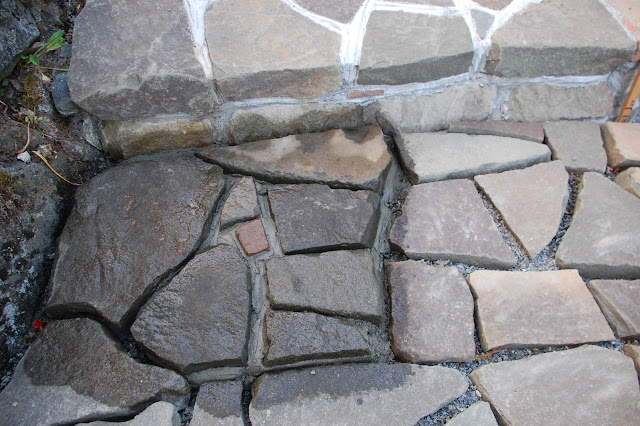 |
Zen-like moment, with stones mortared-in but seams remaining unfilled
|
I do enjoy getting to the point where
the stone pattern is set but the seams have yet to be filled - arguably a path's most zen-like moment, because the effect of the voids is to make the pattern more graphic (photo above). Yet despite the appeal of open seams (which is sometimes done in Japan) I opt to fill them with mortar because this step simplifies their ongoing maintenance. In our wet winter environment here on the coast of Vancouver Island, any trough left open to the elements quickly fills up with soil-forming material that supports organic life (which usually means moss). It is time-consuming keeping seams left open clear of debris buildup (fine perhaps for those with minions to do their bidding, but for the rest of us, not so much!). Filling the seams checks soil development to a degree, although it won't block it entirely. Eventually moss has to be
reckoned with, as it tends finally to cover even mortar-filled seams (especially in areas not exposed to full sun). Along with regular sweeping to prevent debris buildup, I tend to use something that kills moss on contact without toxic side effects (One example of this is Thirty Seconds, which apparently is a molecule shy of being bleach, which it smells rather like). However, you still have to deal with the encrusted remains of the dead moss after using this. Another advantage of filled seams is that the surface can be tooled with a tuck pointer (a brick-mason's tool) which aids appearances and torques the path's grip under foot considerably. And, my feeling is that tooled seams also subtly reinforce a blended - or in
Japanese terms, a 'gyo' - quality in the overall look, emphasizing unity of ensemble over the constituent elements. In the English
landscape lexicon, designs are typically either formal or
informal. However, in Japanese idiom, there exists this middle term for designs blending formal and informal characteristics.
So a path that is 'gyo' by design might involve the use of informally shaped materials (say, irregular chunks of flattish sandstone, in this case) that are placed for compositional formality or neatness of effect. The modern term for paths designed in this manner is stone carpet ('nobedan' in Japan) which is characterized by a blend of formal and informal effects.
 |
Layout finalized, base course set, mortaring presentation stones in place
|
Even an approach as slow as mine eventually yields a relatively complete outcome, after which the one doing the paving can take satisfaction in the work done, while anticipating what is yet to come. In the picture below, I am definitely drawing satisfaction from surveying the job, despite its having only just begun. In fact, the section I'm sitting on will turn out to be the first of four phases, resulting in a complete sequence of walkways. Here I am also enjoying the way my stream-like-flow idea appears to have borne fruit, affirmed by the path's dynamic curve alongside the emerging rockery bed. I am also pleased with how the lip of the waterfall-step thrusts itself forward, implying water's trajectory. At this point my expectations of where this project is heading are expanding in tandem with my appetite for the work still to come!
 |
| Surveying results to this point, preparing for whatever comes next | | |
|
Contriving A New Landing
Given that the way I work is more adaptive than
prescriptive - meaning, more by eye and intuition rather than exact measurement - I tend to discover things along the way that are knock-on consequences of my previous choices. So, for example, when I
intuitively decided to introduce a full-step to soften the incline of the
main run of path, in effect I was also tilting in the direction of making a landing out of the section below it (as a way of levelling out its slope). That conclusion wasn't immediately evident to me, however. Only gradually did I come to realize how sharply the asphalt path descended through the next section, leading to a realization that raising its alignment by a full step at the far end would result in a more level platform. And a landing, while certainly much more formal than the asphalt version of this section, was also potentially more elegant. Despite the uncertainty involved, I felt ready energy for whatever challenges came along. So I continued my experimental approach and excavated the lower half of the asphalt, just to see where that led. It was readily apparent that the entire old path had to come out, in order to optimize the advantages for the new path. Once I resolved the framework, the idea of a landing came into sharper focus.
 |
Asphalt and underpinnings now partly removed, new base compacted
|
I recall this sequence of decisions vividly because I was by then far inside the process of path-making and feeling confident that I could address any problems that manifested along the way. This is a great mental space to occupy, one where creativity flows on irrespective of the challenges faced. I felt optimistic about coaxing the new form into harmony with the previous section's character too. By this point, I had real appetite for more of this form of self-expression, so was coming at the work with a serious wind to my back.
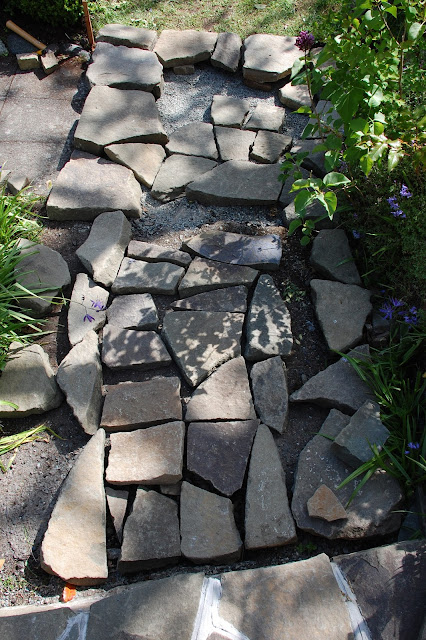 |
Layout quickly (and rather carelessly) roughed-in
|
 |
Defining the height of a new step up, to gain more level for the landing
|
The new landing was laid out in late spring 2012 and mortared-in during the summer and fall. Once the idea of making a landing had resolved itself, I found myself caught up in sequences of entirely creative bouts of work. The photos below show the evolving progression towards a levelled landing in preference to retaining any of the old path.
 |
Some asphalt still remains but the grade is wrong
|
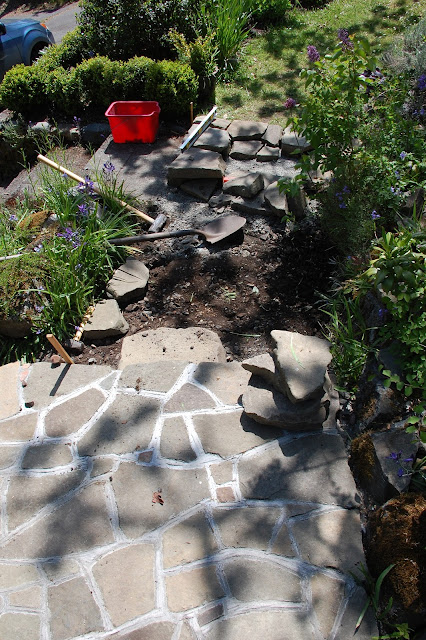 |
Bullet bitten: asphalt out, base being removed
|
With my earlier imprecision about final gradients (and the imperative to decide on these first) I realized that I also hadn't been paying attention to the orientation of my stones. We weren't close to finished design at this point - just hastily canvassing options in order to glimpse potential outcomes - so I hadn't ensured that the stones were laid out across the path's direction. But once a landing was decided on, there was fresh impetus to be more systematic about layout. A new wrinkle emerged however, taking the form of a need to manage my stock of large stones optimally for the phases of work yet to come, including the landing, a flight of steps yet to be built, and an additional but as yet imprecisely defined short pathway to the woodland trail. Principally this meant retaining enough large pieces to meet my needs for edging stone, which led me to use more of my stock of smaller pieces for the landing's interior. The following shots show how I sorted all this through.
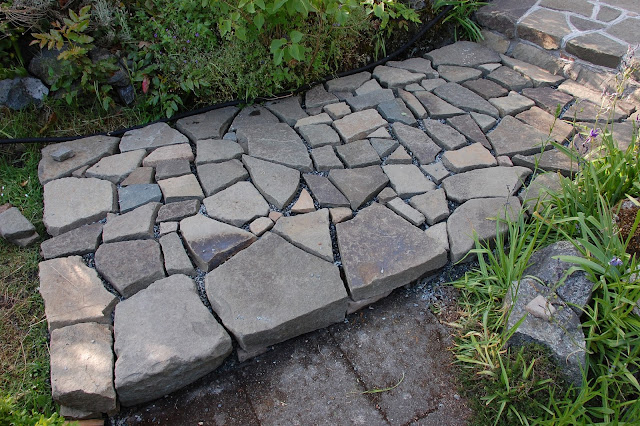 |
Layout redone, now more horizontally, with a more uniform gradient
|
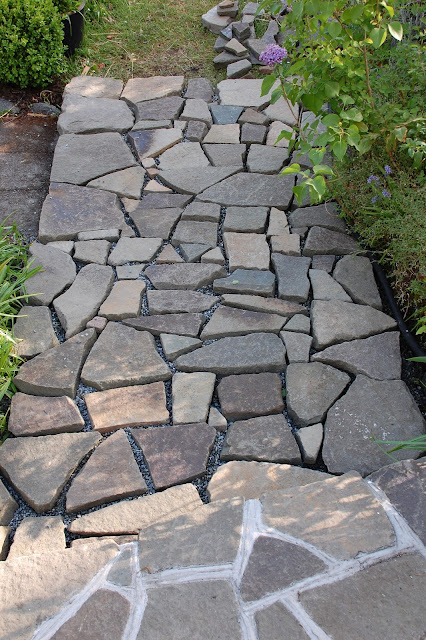 |
Seen from above, format now more horizontal
|
Once the layout felt plausible to my eye, mortaring could begin. This work ran through fall 2012 and was followed, as the weather permitted, by bouts of filling and tooling of seams. While I recall being busy with other garden chores then (fall is like that for gardeners) I somehow found the time and energy needed to bull our new landing towards closure.
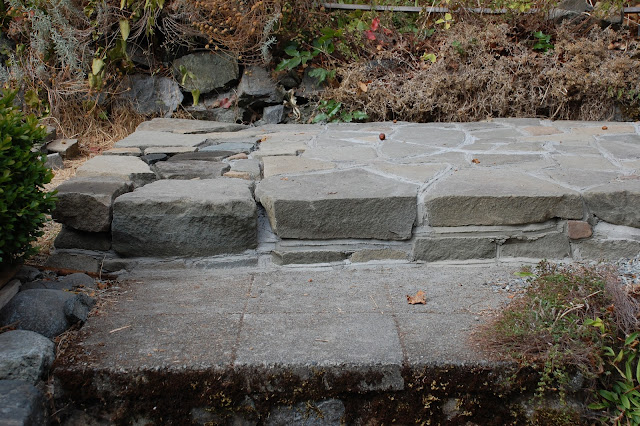 |
The landing now rises a full step up, effecting a hard turn to the right
|
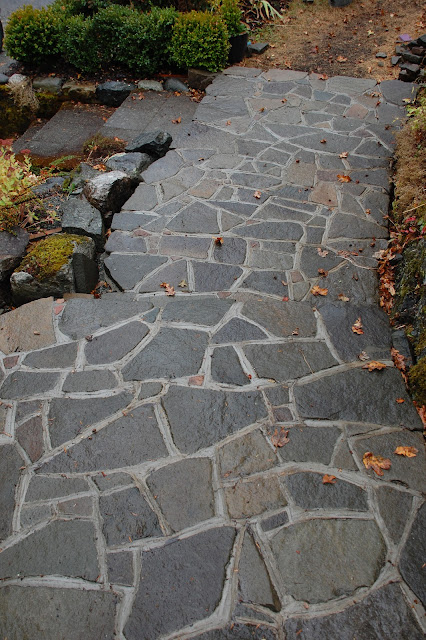 |
Late October, new landing now mortared-in
|
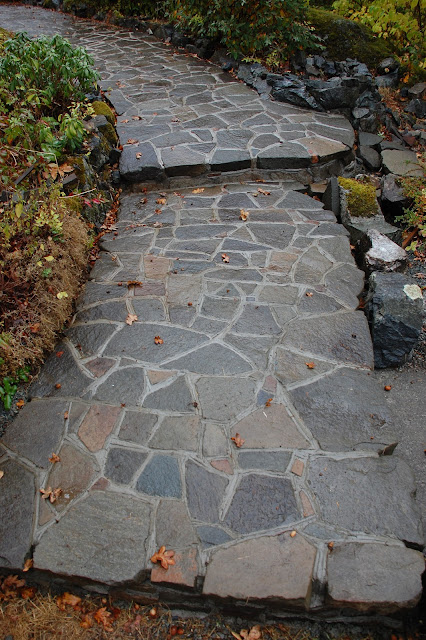 |
New landing seen from the opposite direction
|
By the spring of 2013 the landing had already weathered its first winter and I was readying myself to tackle more paving. Our exterior restoration efforts were approved to be recognized by the Victoria Heritage Foundation, in our home's centennial year, and we had also been asked to show the house on the Saanich Fall Heritage Tour (something we were keen to do). My goal, however, was to advance the paving as much as possible before the tour happened. The next section of path posed novel design challenges, giving it an engaging complexity from the outset. But by this point the merits of trying layouts on for size - and the clear glimpses this afforded of how things would appear once mortared - made me confident I could achieve a good outcome. As the old zen saying puts it, 'the obstacle is the path' - meaning, to me, that facing and surmounting obstacles along the way defines the ultimate shape the path takes.
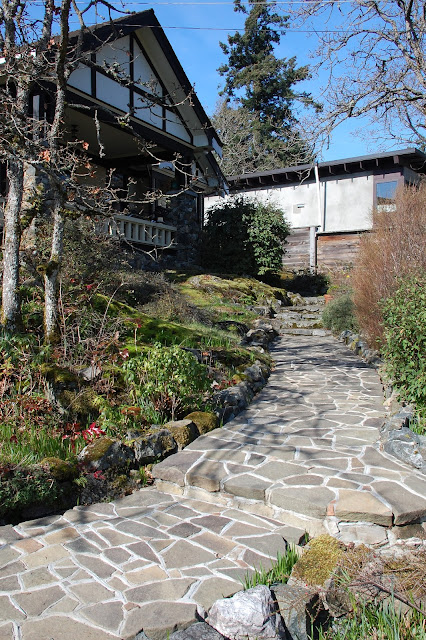 |
Looking smart, if brand new, for the centennial
|
Fashioning A Flight Of Steps
"Where there is a path or flight of steps, the course of it is ruled by the contour of the ground, so that the whole impression is that of Nature smoothed down in places and in others encouraged to do her very best." The Natural Garden, The Craftsman, January 1908
Readers of this post will recall that the main path divides into distinct channels at the base of what I call the waterfall-step, the secondary path angling off sharply towards another part of the front garden. The question here was how best to go about making a ninety-degree turn, especially given the accelerating descent through this section. Here, I felt the
analogy of frozen movement captured by the waterfall-step and the landing should be allowed to flow right into the topmost of what became a new flight of steps. This would lend an aura of mystery and interest to this section of path. It also reinforced the arts-and-crafts motif of the house, allowing me to settle this new path organically into the surrounding contours of the land (the house has built-ins, such as window seats, fitted into the surrounding decor, and the building itself had been carefully inserted into the landscape, with no major disturbance). The typical front walkway in
modern suburbia comprises a fairly straight shot
from parking to a nearby front door. Typically rendered in concrete - a wonderfully serviceable if somewhat bland building material - the front path is often too narrow for two-way use (forcing at least one party, if not both, to take to the lawn). Our front path's alignment fell at the opposite end of this spectrum. Built into the site's natural contours, the path strolls the visitor past the entire facade, before switching hard back to another flight of stone steps that leads to a verandah and front door.
 |
Switchback path that leads to the verandah
|
I thought the path, with its rustic alignment, should provide a more memorable sense of entry to the house, without sacrificing the feeling it belonged where it had been placed. But as I was learning, consistent use of similar stone materials for paving strongly reinforces the impression of long habitation.
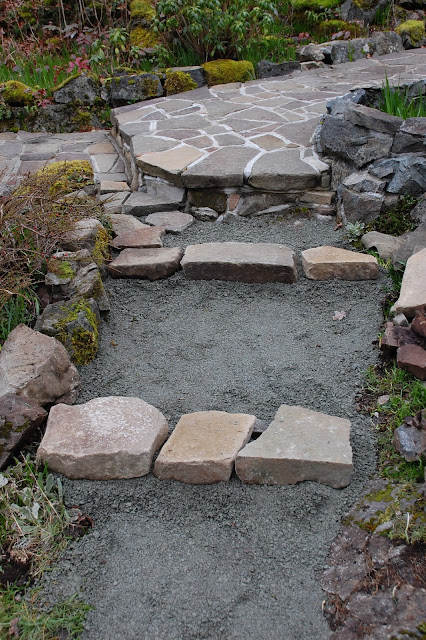 |
First imaginings of a brand new flight of steps
|
The challenge here was to find a way of tying the main run of path seamlessly into the new flight of steps, which were then no more than exposed bedrock up which one climbed. The existing setup connected precariously through some sharp descents before accessing a
distant woodland path that lead to a supplementary parking pad. Heading the other way, the land rises sharply towards the main path, which is what prompted me to think first of a flight of steps. Anyone utilizing the old arrangement was obliged to scramble up a sharp incline in order to finally gain the main run of path. The exposed bedrock complicated navigation of this space (slippery when wet, mossy all winter) a feature that would only become more difficult as occupants aged and their movements became less certain. So my first thought was
to offset the precarious rise here by making at least two, and perhaps three, generously wide steps. Steps here would lessen the challenge associated with this route, enabling more comfortable access from below. A major issue was scaling the new
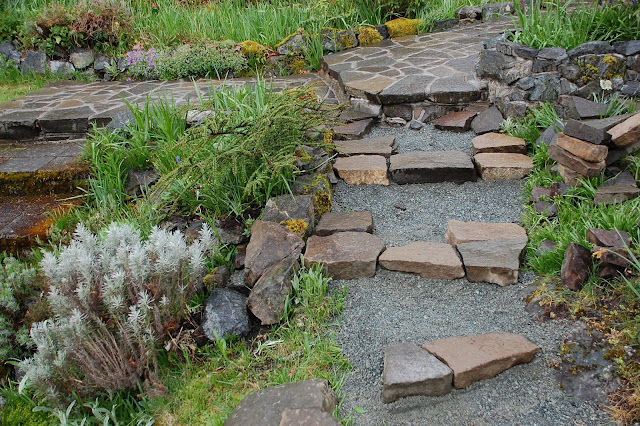
steps to fit with the main path and landing. This meant avoiding mistakes like making them too petite for the scale of the main path. Initially (photo below) when I roughed in the first step, I gave it insufficient tread-depth to be truly comfortable in use. The experimental method however, affording glimpses of outcomes before construction, was invaluable in working this piece of the puzzle out.
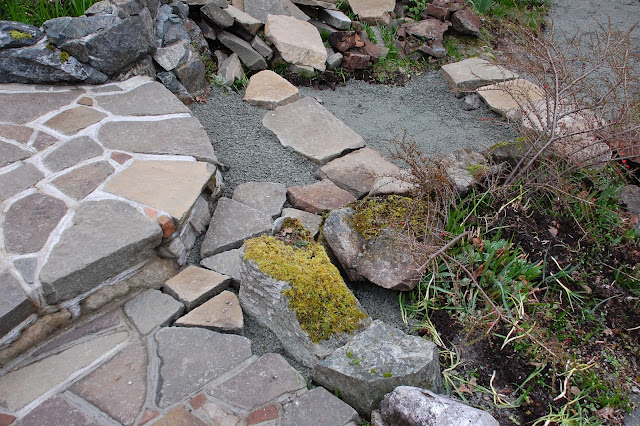 |
Complexities: bed edges to be shaped, steps to be fitted into landscape
|
 |
Top step now deepened to better fit with the main path and the landing
|
There were many things to consider before arriving at a workable design for the new steps. First was a decision to flow the landing level around the adjacent edge, so making it continuous with the surface of the first step
(layout just emerging in the picture above). This feature allows the movement of a loaded wheelbarrow from the top step to the landing without having to hoist it up to the level of the main run of path (a choice that is motion-minded, especially when the wheelbarrow happens to be loaded with heavy material, like stone).
But the steps themselves also needed to feel they were settled into the site's contours, in order to mate with the rest of the path. Rockery beds on either side of the steps helped orient my designs here - once again, they became co-defining, so grew in tandem with the shaping of the steps. Accordingly, there
was a lot of feeling-our-way-along through this section of path, ultimately leading to choices about tread-depth and the finished look we wanted to achieve. This is where a willingness to play around with possibilities can pay huge dividends. Steps were a definite advantage in this locale, but the actual number required remained unclear (you can make out an embryonic (possible) third step at the base of the photo above). Finalizing the layout would ultimately define a fourth phase for this project, but given my adaptive method, it remained to be clarified. One needs to have the right frame of mind to get results from
this type of design exercise, where distinct entities like bed edges and paths become co-defining. However, spring's return inspired getting out there on the land and getting on with the job, so we just rolled on!
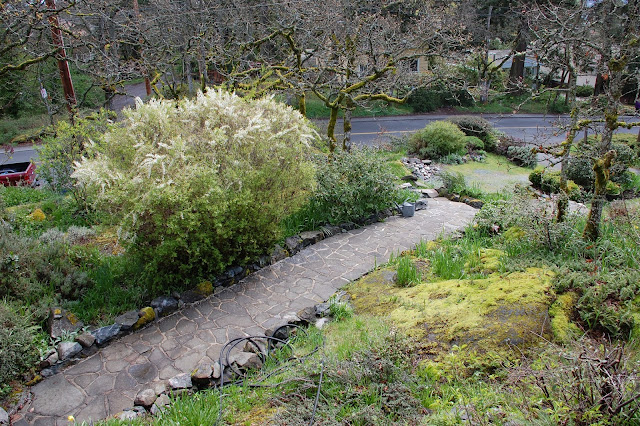 |
The return of spring brings fresh opportunity for stone step-making
|
There was a lot of fooling around in getting to a final design, but the bedrock the steps sat on made a stable foundation. Once you commit to mortaring stones in place, they are well and
truly fixed in place (comprising a new datum, as it were) - and so I needed to be certain that things were going to work out, in all dimensions, before
mortaring any layouts into place.
 |
| First step at the landing level, large stones conferring greater heft |
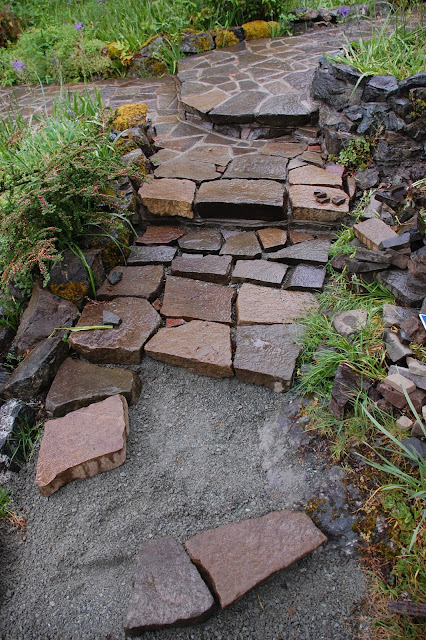 |
Top step mortared, second step now emerging
|
By May and June of 2013, things felt like they were
progressing fairly well. I find the act of setting an emergent step's shape to be supremely satisfying - you get to witness the birth of finished form, but initially with the voids between stones left open (emphasizing the gaps - photo below). Filling of the seams demands careful work too, work that's time-consuming and finicky in regard to placing mortar in narrow spaces without slopping it around, but also rewarding and strangely satisfying as things to move towards closure. We get to observe the individual components of the path magically fuse into a cohesive composition.
"Follow the path through a picturesque landscape and you will come upon a succession of distinct places, each designed to evoke a distinct emotion." Michael Pollan, A Place Of My Own
Once summer comes, paving needs to be got at earlier or later on in the day, as the sun is simply too strong otherwise and hurries the mortar relentlessly. This in turn hurries you, which increases the likelihood of mistakes. If mortar sets up too quickly through direct exposure to intense sunlight, it
also fails to develop optimal strength. Things can be done, however, to slow these sun effects down, for example: using a hand mister to keep mortar and adjacent stones moist during seam-filling. You can also cover the newly mortared stones so they are shielded from direct sunlight while mortar cures. I find this to be an ideal use of my old election signs, elevated above the fresh mortar on small chunks of stone, to avoid any contact with the freshly tooled seams.
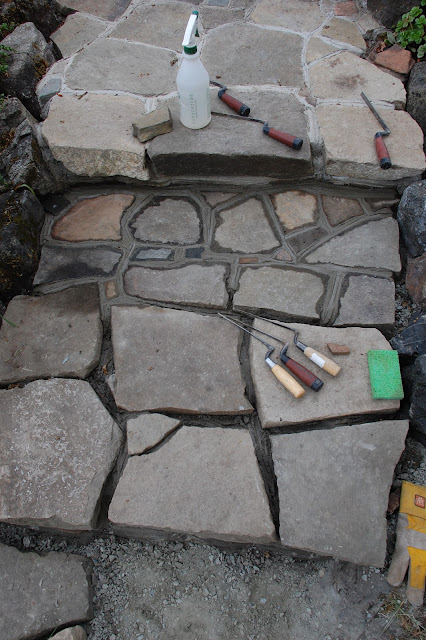 |
Tooling seams for better grip, and aesthetic effect
|
 |
Tooled seams using tuck pointers of varying widths, for grip and effect
|
 |
Hand-misted after tooling seams, drying slowed for optimal strength
|
Creating A New Stub Path
As noted earlier, I had difficulty deciding
whether it should be two steps or three. That was because there remained some distance to be traversed before one finally reached the woodland path. The choice resolved itself into either making a deep third step or, more realistically, designing a short stub of path instead. So I decided to try laying it out as a path, so I could gain an impression of how this would look on the ground. The alignment ran through a
dip in the land, complicating matters somewhat. I decided to level the dip up with crusher fines, which enabled me to rough-in the short section of path. The picture below shows the dip filled and a quick prospective layout in place. This step reinforced the idea's feasibility and utility.
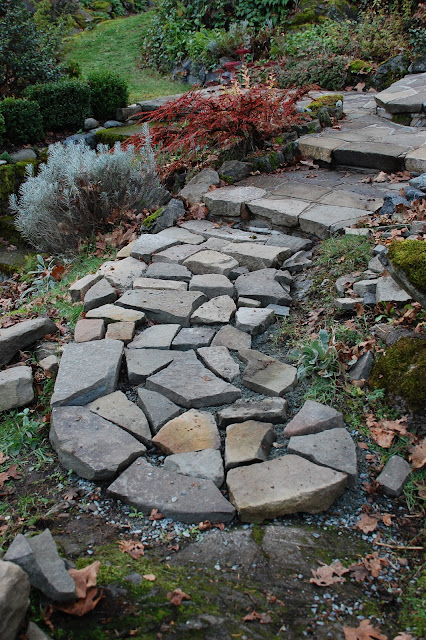 |
Back-filled, quickly roughed-in to afford glimpses
|
This work was happening in early autumn 2013 after the fall heritage award ceremony and the house tour. Conditions for path-making were ideal by that point: warm enough to still be pleasant working outside in shorts, yet not uncomfortable even in direct sunlight. This was optimal for the sort of playing around with layout possibilities that unearths novel designs. Despite this section being narrower than the main run of path, I still wanted it to feel substantial and in balance with the scale of the steps. I still had some
chunkier pieces of stone left, so I could continue my practice of using large pieces to define the edges of the path. Continued use of larger pieces gave the stub path a look of heft, which is good because in this location the pavement appears more boldly than it does on the main run (where the edges are bounded). Anyway, I was determined to finish the job with the materials I had on hand rather than delay finishing by going off to collect more stone. As it was, fall leaf raking and compost-making took over, and then suddenly it was winter again.
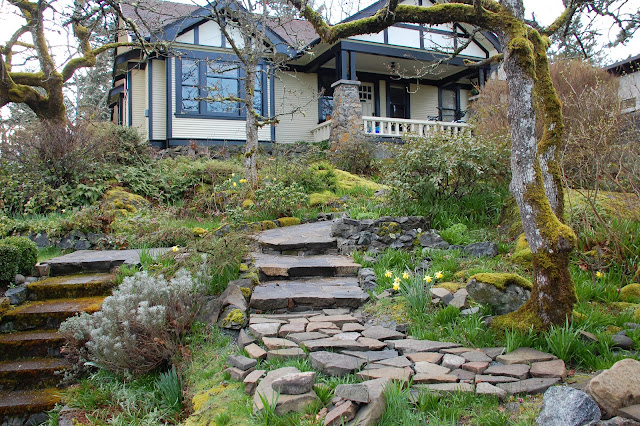 |
Early spring freshness allows one to refine a layout in ideal conditions
|
Winter's forced break in activity prompts reflection, and at some point I realized that beyond the dip there was another issue having to do with a significant cross-fall through this section: the gradient fell away on the south side of the path (i.e. to the left in the picture above). Given this geodetic fact and the reality that the segment sits visibly above-ground, especially along its southern edge, I decided it would be imprudent not to add a base course under this edge. A base course of stone had the effect of thickening the path considerably while projecting it as stepped down to be congruent with the sloping ground. The next picture shows the stub-path with a base course roughed in under it. Shoring up the edge in this way would give the path feelings of greater stability, but it would also entail substantial additional mortaring. The idea is shown in draft in the next photo.
 |
Base course inserted under the stub path's south side, for stability
|
One day, contemplating things, I realized that my stub-path had assumed a somewhat phallic appearance, a thought that was initially very off-putting (photos above and below). But thinking things through at a deeper level, it struck me that the path's shape had been derived organically from the dimensions of the space it was contrived to be fitted to. So, no matter how phallic its appearance, it did enable movement in the exact manner needed. Awareness of this fact allowed me to relax about any implications of shape, ultimately meaning a focus on refining the design as much as possible.
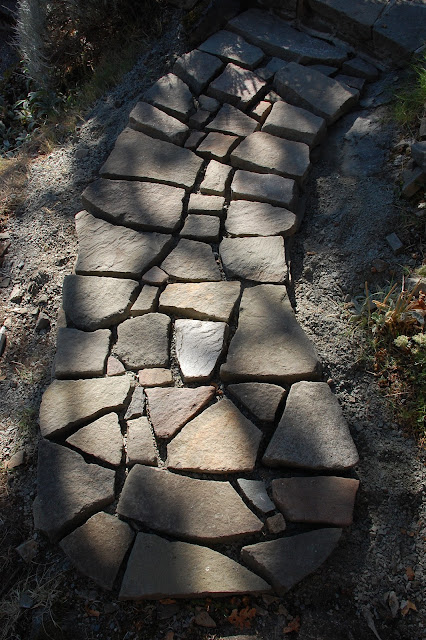 |
Modestly phallic stub pathway emergent
|
Once layout reaches a point where all the inner tests have been met, the process of mortaring stones in place can begin (a most enjoyable moment too, the more so as this was the final phase of the project). By this time I was confident of being able to shape my stone placements so they would stand the test of time (i.e., outliving me substantially). This made fixing the last stones in place feel supremely satisfying. The following shot reveals that part of the process in motion.
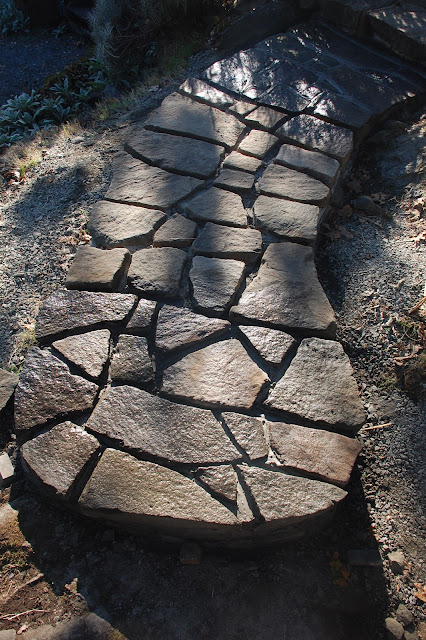 |
The new stub path now mortared in place
|
Once set in mortar, the artistry of tooling the cemented voids awaits attention. This is the moment where finished paving fully emerges, where we get to see what's been held in the imagination for so long suddenly pop into being as a built object in a real landscape. Feelings of pride and satisfaction ensue.
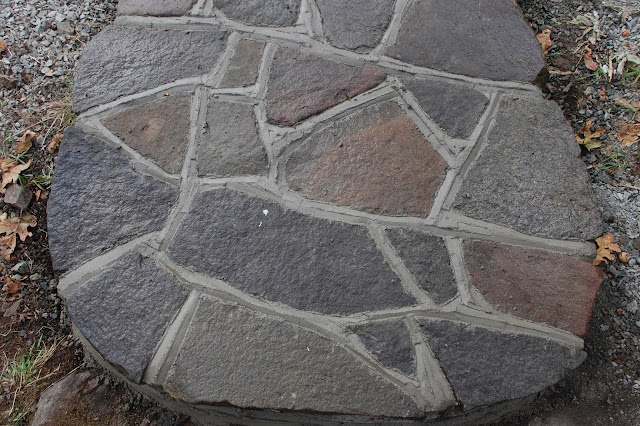 |
Just finished, the mortar still wet, joints tooled and looking smart
|
When a project has gone on for years the way this one has (executed mostly in spare moments, in a leisurely manner, weather
permitting) the maker gets very attached to the work process and habituated to watching its slow progression towards finished form. When it all finally does come to an end and the job is
apparently complete, there ensue contradictory feelings of satisfaction
and, perversely, an intense longing for more of the same. In the end, the job really isn't completely done anyway, because there is still finishing work to be done on the adjoining beds and
path edges. And, of course, there are other paving jobs calling out for
attention elsewhere in the garden, and likewise a host of other garden responsibilities that have been semi-neglected during the paving process. But none can seem so prominent as this undertaking has been,
and certainly none has so much riding on the outcome. Looking back on it over a decade later, I still
find recalling the long process of design and construction an immensely satisfying undertaking. The finished path feels like an enduring part of the gardens on Grange Road - so much so that it's virtually impossible to imagine the place without it. The sandstone I used has a grain open enough to age and weather readily, which is
both a strength and a weakness. On the plus side, it does mean the stone appears not-new in short order, reinforcing the impression that it belongs where its placed - indeed, that it may really always have been there! This
sense of it being fit-for-purpose contributes to the overall feeling of repose that I wanted for the garden surrounding an arts-and-crafts house. And of
course, this entry pathway helps structure perceptions of that garden's spaces and of the architecture's overall harmony with the land, drawing you in as it carries you through sequences of engaging
scenery. Below, I offer a few more shots of the front path evolving and changing through the course of the seasons and the years.
 |
After spring's first flourishing, it's trimming time
|
 |
| Stub path and steps in wet fall, oak leaves down | |
|
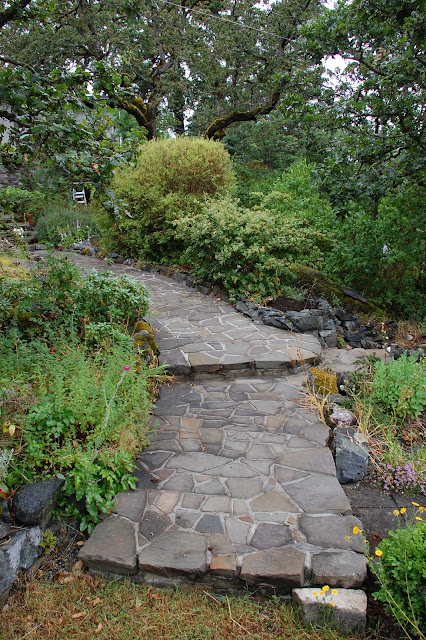 |
Drying out after a mid-year summer downpour
|
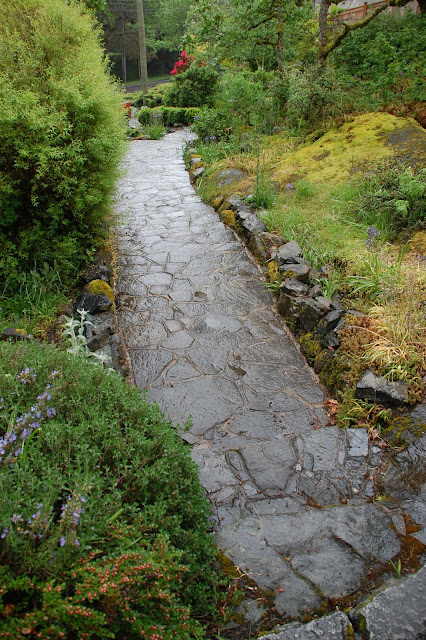 |
A stream channel traversing the hillside
|
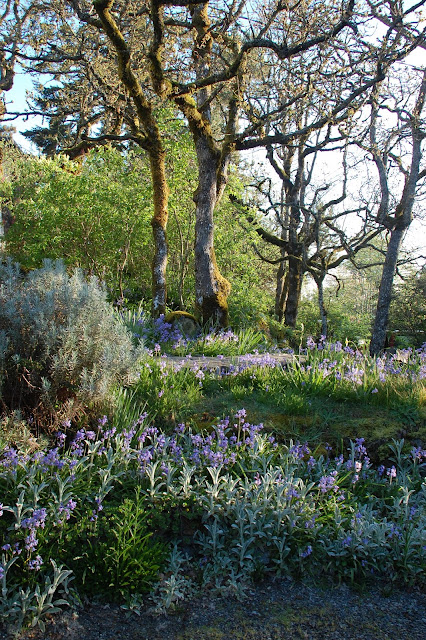 |
Woodland path with early spring bluebells
|
 |
Rockery beds, flight of steps, and Rumble the cat, fall of 2022
|
Note on stone carpet paths:

Nobedan is a modern Japanese
term for a particular approach to path design, involving contrasting
arrangements of stones mixing naturally rounded pieces or chunks split into flattish slabs with other stones worked
into more formal shapes (oblongs and squares mostly). The path pictured to the right gives an idea of how this technique is used in Japan, but stone carpet paths are now also made outside Japan too, where they tend to be less formal and less-zen in appearance than customary in Japan. Nobedan translates roughly as 'stone carpet'
in English, an approach to design that can result in distinctive outcomes. Antecedents of stone carpet designs were sometimes referred to as
tatami-ishi (literally, 'stone mats', after the tatami-mats
that figure prominently in traditional Japanese homes). Japanese path makers sometimes mix cut stone panels as edges with sequences of irregular found-stones in ways that have zen-like results (inset photo, above). These stone mats often come with quite strict linear edges due to the use of cut stone. But in North America, stone carpets tend to be made of irregular fragments of fieldstone or flagstone without the characteristic use of squared or rectilinear stones (which are not readily or commercially available, as they are in Japan). My own path was contrived of flattish sandstone pavers, hand-collected and of random shapes and sizes. My design challenge was assembling
them into an ensemble that was both useful and beautiful (cf William Morris). One thing I learned from examining photos of
other stone carpet paths is that a distinctive look can be achieved by deploying larger stones as edges. I borrowed this idea for my design and found it worked well in practice. I
also began seeking a rough equivalence of size between edging stones on both sides, an idea that tends towards a more balanced outcome.
Another idea gleaned from examining photos involves the practice of echoing adjacent facets of stone in layout, so that the individual pieces blend more readily into a whole. This in turn helps the stone to feel it belongs where it's placed. This became a key organizing principle too – one face echoing the next as much as possible, without too extensive a reworking of surfaces with hammer and chisel (I try to avoid over-working my stone, as going further with local sandstone inevitably runs the risk of epic failure). As much as possible, I try to utilize the facets the stones naturally came with, seeking ways to amplify distinctive association among slabs through creative placement. I am very pleased with the outcome of this principle of placing like-with-like-facets,
and would recommend it as an approach to anyone thinking of building a path in stone-carpet style. Japanese path-makers also readily accept the use of mortar as a medium for knitting arrangements into a kind of permanence, recognizing it increases their range of design choices. Using mortar allowed me, for example, to 'float' the individual pieces of stone towards a final placement that strengthened the association of the parts as an ensemble.
Japanese artist-gardeners often employ a trio of terms, originating in calligraphy, to
describe the composition of aesthetic objects, including garden paths:
'shin, gyo, and so', where 'shin' refers to the formality of
geometrically cut stone, and 'so' contrasts with it in the rustic quality of
broken stone or rounded cobbles that are subject to gravity and rivers. 'Gyo' is the middle term, chiefly used for designs seeking to balance the poles of formality and rusticity. Overall, my path was decidedly 'gyo'
in composition and arrangement, but the stone slabs were probably somewhat 'so', inasmuch as they randomly broke into various shapes by whatever process was used to extract them from the ground. My attempt at 'gyo'-like quality
derived from combining edge-stone discipline with the echoing of like-with-like-facets, which is a way of composing a cohesive whole from
the fragments and residuals of eons of geological process combined with the effects of more recent human extraction. There was also the idea of setting stones consistently across the direction of the path, which slowed its aesthetic momentum down. I must say I enjoyed every minute of this exercise, because it stretched me creatively, a lot.
Books For Looks:
Michael Pollan, A Place Of My Own, Random House, New York, 1997.
Garden Technical SeriesISBN4 - 87460 - 778 - 0
Japanese Garden Design, Marc P. Keane, Tuttle Publishing, 1996.
Space & Illusion In The Japanese Garden, Teiji Itoh, John Weatherhill, New York, 1973.
Flow: The Psychology of Optimal Experience, Mihaly Csikszentmihaly, Harper Perennial, July 2008.
Garden Paths, Gordon Hayward, Camden House Publishing, Vermont, 1997 (especially Chapter Four: Stone Carpets: Informal Fieldstone Walkways).
Shop Class As Soulcraft: An Inquiry Into The Value Of Work, Matthew B. Crawford, Penguin Books, 2009.
Path pictured by Vasila Romanenko illustrating restful crosswise placement of paving stones.




















.jpg)
