 |
| Hard to believe it now, but it was all over by the first week of June 2023 |
It was pretty much inevitable, given our situation: age finds us all in time, presenting novel issues that make work that once was so easy suddenly arduous to complete. The process of aging is all about encountering this effect: what one once took for granted, or at least found not so hard to do, gradually becomes more and more difficult. Some of us look farther down that particular road and see it complicating life to the point where it becomes something entirely different from what it once was. I'm one of the lucky ones who, while not yet at the point of being unable to do the work, could foresee a time when that eventuality comes about. So that was a major factor in our decision to sell.
 |
| All maintenance holidays eventually end: Vern Krahn restoring barge boards |
There's also the financial reality of inhabiting a heritage structure today: they require ongoing investment in order to remain viable. There are always services needing upgrading, issues around sourcing things like compatible storm windows that help keep the house warm in winter, ongoing appropriate rehabilitation of degrading wooden components (as in the picture above) and replacement of bits that are now wearing out, like the cedar shingle roof (maybe six to eight years left, if the right things are done to prolong its life). None of this is simple, all of it requires discretionary money to purchase skills, and in retirement, money is in short supply for many. There is also management of the processes that renew the building (the individual contractor doesn't actually do this, or at least you don't really want him to be the one who is doing this, so you yourself have to be the general contractor on the job - which is demanding work and entails understanding the job fully). Also, at our place, there were long-deferred plans to develop an unfinished storage attic by making a staircase with a complicated landing and adding a west-facing dormer, which would enable us to access perhaps 900 square feet of added living space, including a much-needed second washroom off a master bedroom. We had been evolving plans to realize this dream when our life suddenly got complicated with the inheritance of a Pender Island property similarly needing major investment. We couldn't afford to do both projects, so we chose to reinvest in restoring the Pender property. We don't regret that, but it turned out to be consequential for the bungalow on Grange Road.
 |
| Re-roofing the house with perfection cedar shingles, back in 1998 |
These two realities (a lot of work suddenly needing doing, plus insufficient funds to bring it all off) eventually converged in retirement, making sale and a move more or less inevitable. We saw it coming a couple of years back, yet wanted to keep going for the time being so we could enjoy a place we had put so much of ourselves into. This post covers the things we managed to tackle over the last couple of years, prior to actually putting the house on the market - things that, in retrospect, we are proud to have seen done on behalf of a most deserving house.
 |
| Facade renewed in time for the house's centennial |
A
recurring theme these days is just how much actually needs doing on an older house, a dynamic that has intensified as I've aged (perhaps the reality is that the aging process magnifies the effect). You simply have to stay with it in order to remain contemporary: no maintenance
holiday lasts forever, and many such holidays inevitably come to a close on your watch, especially if you've dwelt there for a while. It
was thus not surprising when one of the very first things initiated on
assuming my tenancy here - replacement of the wooden gutters on the rear of
the house, including replacing some missing downspouts - now obviously
needed further attention. The gutters were done back in 1989, a year after I bought the place. I managed to source old-growth cedar
guttering to replace the original ones (milled to an authentic profile by Vintage
Woodworks in Victoria) but I naively employed a carpenter who, while technically qualified,
turned out to lack experience with wooden gutters.
In fact, I'm almost certain this was his first undertaking on any
arts-and-crafts house, and while he didn't do a terrible job, he did miss some
obvious things, like replacing fascia boards on the south-west
section, which were starting to have issues as rot from the existing spent gutters had reached back into them.
 |
| Scene of the crime: restored wooden gutters en route to premature demise |
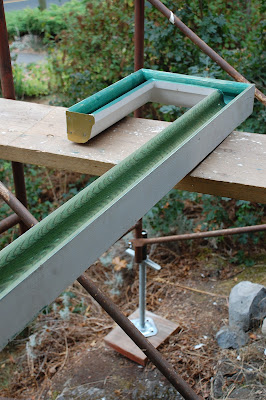
Instead of informing me they needed replacing, this carpenter found just enough viable wood to attach the new gutters to. He also didn't know to use pitch (or a copper-based preservative, inset photo at right) to condition the new gutters, a step that dramatically increases their longevity. As a result, the replacements were already rotting out thirty-three years after installation (the original pitch-treated cedar had lasted nearly seventy-five years)!
And by then the fascia had only deteriorated even further. So there were now a lot of hard decisions to be made. Pivoting from the purity of my initial choice to stay with wood (wiser with hindsight) I had metal gutters in a compatible profile installed in preference, with larger (and thus fewer) downspouts needed. There were numerous advantages to going this route: the metal gutters are wider than the wooden ones, making it easier to clear out the build-up of oak leaves and debris in fall (especially given the cedar roof's drip ledge, which makes it difficult to extricate leaves from narrow wooden gutters). Plus, larger downspouts don't block as readily as the narrow ones, which plugged every year with the onset of fall rains, with predictable consequences. So these are big advantages in drainage and I was very pleased with the results.
 |
| Metal gutters, fascia and downspouts replaced |
I think it would be fair to say that it got much more difficult to get anything done to heritage standards with the advent of the pandemic: costs rose dramatically while booking times became markedly longer as pandemic conditions combined negatively with the ongoing process of skilled artisans retiring or passing away. People were also more focused on their home patch, so skilled carpenters were extremely busy. These dynamics complicated everything to do with renewal, including something as small and seemingly straightforward as re-cording a double-hung sash window. This is a job that periodically needs doing in a house equipped with double-hung windows, and sooner rather than later if the occupants happen to have painted over the sash cords at some point (which renders them brittle and hastens their demise). The previous time I needed sash-cords replaced, the masterful Vern Krahn was still available for small jobs like that - yet even someone so knowledgeable needed a couple of hours (it's very finicky work) to re-cord a double-hung window. It takes a certain finesse in order not to damage the window frame. But alas, Vern was no longer available, so I resorted to the market and tried booking several carpenters on the municipal heritage list, but ultimately it was just too small a job to get their attention. Then, out of nowhere, along came Brook Baxter, a highly skilled carpenter who had done fantastic work for us rebuilding the place on Pender Island. Brook had time for an add-on project on the weekend, and was intrigued by the job, as he'd never done it before. I couldn't believe our good fortune!
 |
| Brook Baxter, a carpenter game to explore something entirely new |
We began the process by doing some research, which to me means seeking advice from people with greater knowledge, in this case Brigitte Clark of the Victoria Heritage Foundation. I wanted to use authentic components for the job but found that nearly everything available came with some amount of polyester in it - which is as inauthentic as it gets in a heritage building! I asked Brigitte about sourcing genuine sash cord - 100% cotton woven with a special braid - and she knew where to find it! Thanks to the folks at Acklands-Grainger on Government Street, I secured a supply of genuine cotton sash cord, at a very reasonable price.
 |
| Genuine article: pure cotton braided sash cord, polished, in 100 foot length |
Brigitte's contributions to the window project continued with the sharing of a couple of pamphlets championing retention of heritage windows, plus one dealing directly with sash window-cord replacement. I also watched a couple of YouTube videos on restringing cords, in order to develop a clearer idea of the steps involved in doing it right. It's a bit complicated, as there are heavy counter weights inside the window frame that enable easy movement of the sash up and down (in a double hung window, there are two counter weights inside the frame on both sides, allowing both sash windows to operate easily). Brook is fortunately a quick study, and very curious about the nature of wood construction, so he was quick to figure out how to tackle this project. Initially it involved finding a couple of removable panels giving access to the weights, and getting them out without damage.
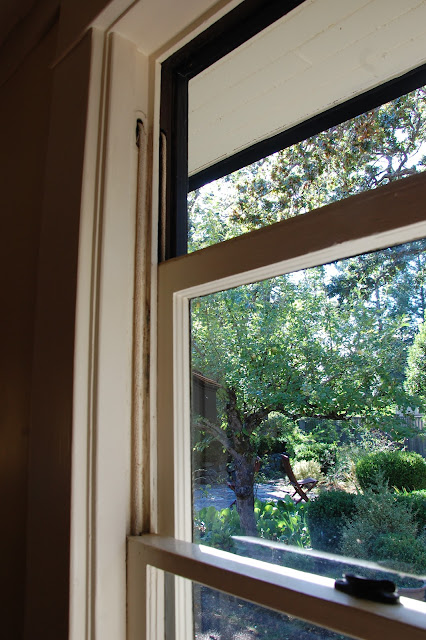 |
| Counter-weighted sash windows vent extremely well |
The counter weights are surprisingly heavy and operate in severely constrained spaces, side by side. But with genuine sash cord, they work well and will last long - if the installer knows what they're doing. Getting the weights out is a real chore, but Brook was totally innovative at this work.
 |
| Counter weights, rotted cords, some tools and parts used to get there |
Restringing the cords is where the real skill comes in. Even the knot used to attach the cord to the counter weight is complicated - not just any knot, but the precise one that knowledgeable carpenters use, firm and durable. Brook, who is also a skilled fisherman, knew his knots from boating, so this piece came natural!
 |
| Finesse with knot-tying is integral to successful re-cording of windows |
I'll resist getting into the minutiae, but there's a lot of knowledge that goes into restringing the cords on double-hung sash windows. I'm all admiration for Brook's willingness and ability to learn on the fly, which powered this job to completion.
 |
| A thing of beauty: cord restrung, right knot used |
I can't say enough about Brook's skill and panache in bringing this job off, and to a very high standard indeed! I thought enough of his stellar work to make him an extra special brunch as well as paying for his time, but honestly, I am in awe of his craft skills in carrying the job out.
 |
| Finishing up: the master craftsman at work |
Brook's work on the sash-cord replacement inspired me to tackle some more deferred tasks myself. A redecorating project for the room ensued after the window had been restrung and a large cupboard retooled for better storage (also Brook's handiwork). The decorating project went on through late winter and into spring, with a rhythm of its own. I did about two or three hours a day on it, which kept the job inching forward over time.
 |
| Redecorating rooms is ninety percent prep and ten percent repainting |
Later that year, in November, I had an unexpected and meaningful connection with the family of the building's first occupants. I had become Facebook friends with Kim Barth Kembel some years back, one of Joy Savage's daughters. Now she and her daughter-in-law Shansi Zhang proposed visiting us late in 2022, on their way up-island. Joy, who was Hubert and Alys Savage's daughter, married Alfred Barth, both of whom I was fortunate enough to be in contact with over the years. Joy and Alfred were kind enough to share copies of two floor plans of the house, drawn by architect Hubert Savage, which among other things put to rest any ambiguity as to whether he had designed his own home. These floor plans have been a huge aid in developing an understanding of the building (I am resolved to make sure the Saanich Archives has copies for their records). It was absolutely special to meet Kim after knowing her long-distance for years - she recalled summer vacations spent here on Grange, in the company of her mother while Alys was still alive. It was an entirely memorable experience for Susan and me. I was thrilled to be able to point out to her Joy's signature, just discernible on the concrete art-deco steps at the back of the house.
.jpg) |
| With Kim Barth Kembel on the verandah at Grange Road |
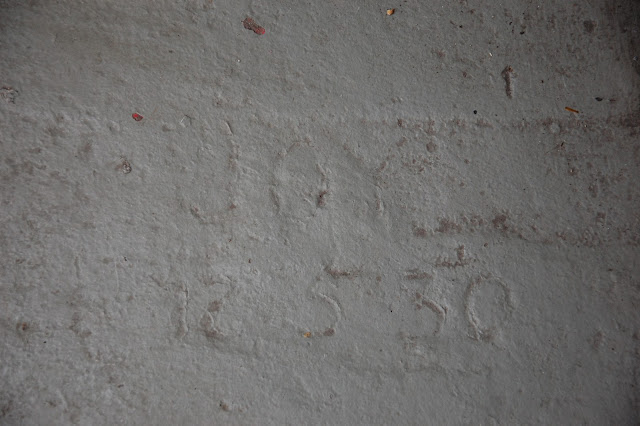 |
| "Joy, 12-5-30": the date the concrete steps were cast, with Joy present |
I was earnestly trying to mobilize myself to keep getting things done, even as it became harder with pandemic restrictions, supply-chain constraints, and most craft attention now focused on new construction. One consequence was that there were much longer booking times for everything. This was certainly the case with refinishing the claw-foot tub in our sole bathroom. It badly needed redoing, as its synthetic finish was really worn and there were multiple chips too. The booking time for the Bathtub Doctor (the outfit that does the best job) was over six months, which meant it wouldn't be finished until March 2023. The six months prior to the booking were tough ones all in all. My sister passed away in late winter 2023, an event that was emotionally preoccupying for me. As it happened, The Bathtub Doctor was scheduled to recondition the tub the same week we were to be away at my sister's funeral. Talk about quirks of fate! Fortunately, our son Bryn was quite able to manage the job in our absence. The Bathtub Doctor did an excellent job too, which helped me to feel a bit more optimistic about getting things moved along around the house.
 |
| Refinished clawfoot tub in afternoon light |
A really important job that I absolutely wanted to see done before putting the house on the market was having the shed re-roofed. The shed was designed as an eye-catcher that could be seen from the kitchen. I was concerned about the condition of its roof, as it sits under oak trees and accumulates a lot of debris. I'd been chatting with Jared Brokop, who runs Brokop Roofing, about whether we were at the point of needing a new cedar roof installed. Initially he thought not, due to the super-tight spacing of the shingles on the original roof. Upon closer inspection, however, he determined that the shingles were becoming spongy (so no longer shedding water effectively) and that a replacement roof was definitely in order. This conversation happened during the winter, when roofing activity typically pauses. But we agreed Jared would tee the work up as soon as there was open weather in early spring.
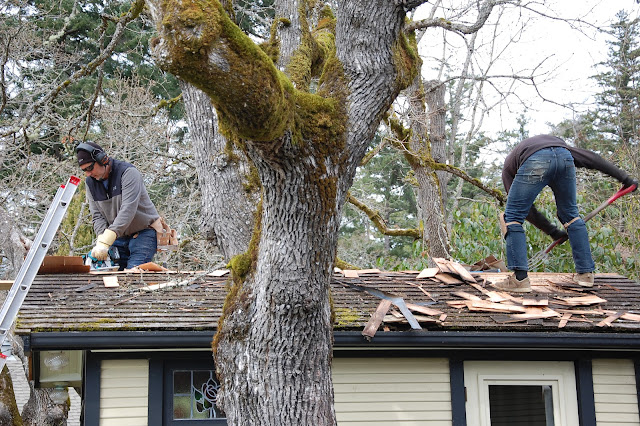 |
| Early in April 2023, a three-person crew got to work on the shed roof |
Suddenly in early April, the job was on. A three-person team arrived on a Saturday and began stripping the old roof off, then replacing it with number one 'perfection' sawn cedar shingles. This type of roofing is now a very expensive proposition, so we were fortunate the roof was as small as it is.
 |
| Three people working meant the job proceeded rapidly to closure |
I was very excited watching this work unfold, which it did very rapidly, basically over the course of a single weekend. The new roof had an impressive impact on the eye-catching shed as seen through the kitchen windows. I'm used to this building's overall effect, but I'd forgotten just what a strong impression a brand new cedar roof makes!
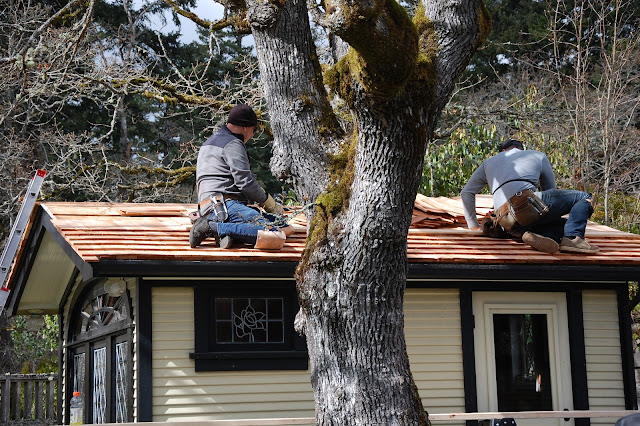 |
| The weather cooperated fully in the short window needed for re-roofing |
It takes incredible skill to do cedar shingling to a high standard, but Jared and his team have the requisite skills in spades. A lot of finesse went into the job. And, because they were well-organized in the way they went about it, the mess was pretty much controlled and also removed as part of the process.
 |
| They almost finished the job over the course of that weekend |
As it turned out, Jared had to come back to finish up the ridge cap the following week. It wasn't long after they were done that the balmy spring weather headed south and it began hailing. Welcome to the world, new shed roof!
 |
| Roofs take a definite beating, twelve months a year |
It was a busy spring for us, as we were now cruising towards putting the place up for sale. This leant a sense of urgency to getting things done: for example, for a long time I'd wanted to replace a the two wall sconces I had installed in the living room 25 years earlier - bona fide period-ware, they simply were discordant with the rest of the decor. They also didn't make for the indirect or shielded (therefore interesting) light that fits so well in an arts-and-crafts house. This is a cardinal sin in an important space like our living room! It happened that for the project on Pender, we had used an oriental-style lantern to good effect, in a variety of sizes. And we just happened to have a couple of wall sconces left over from that project. These iridescent lamps were installed in early May of 2023, and we are very pleased with the light they give off.
 |
| It gave me great satisfaction to replace the existing sconces with lanterns |
Of all the things I wanted to see done before I left Grange Road, repairs to damaged panels on the Lawson Wood frieze (picture above) were at the very top of the list. Somehow, almost magically, the super-talented Simone Vogel-Horridge managed to squeeze this work into her busy schedule. The frieze is one of the things that convinced me to purchase the Savage bungalow over 35 years ago. As entrancing as its effects are, there were nonetheless several damaged areas (whether by exposure to daylight, chemicals leaching from a previous wallpaper behind, or from outright human error) and they needed attention. This is not work for amateurs. It takes immense skill and vast knowledge to undertake repairs to historic wallpaper. Simone has these skills, but the challenge was getting her attention for a relatively small job. We managed to slip this one in just under the wire!
 |
| Simone exploring precise colour matches in preparation for repair |
It had always irked me that the signed frieze in the living room had deteriorated at a number of points. Stuart Stark recommended Simone to me as someone who could work magic in a situation like this, and he was absolutely right. It took a long time, and a good deal of patience, to get Simone's attention on this project, but once she was seized of it, things really flowed.
 |
| The serious business of identifying accurate colour matches |
If memory serves, Simone and her assistant Will visited us in early December 2022, to undertake a detailed assessment of what repair of the frieze would involve. It would be some months before they returned to complete the work, but they needed to produce entire replacement panels that would blend seamlessly with the original artwork. Luckily, I had acquired two Lawson Wood prints in the same frieze pattern (but in entirely different dominant colours) that provided a template for his rendering of clouds - Simone copied this detail with absolute veracity, as it was the key to two of the missing linking spaces.
 |
| Will preparing to position a replacement panel, for colour comparison |
Simone was hard at work adapting the base colours so they blended better with the rest of the frieze, which had been discoloured with smoke from tobacco and the fireplace over many years. Her way of dealing with this was brilliant: she literally adapted her base colours to mimic the effect the smoke had had on the original frieze.
 |
| Simone conditioning and toning a replacement panel |
To say I was excited by this development would be rank understatement - it was a form of magic being worked in the interests of original art that I valued immensely.
 |
| New panel prior to being conditioned to mimic smoke effects |
I was more than pleased with the results of this long-delayed process. We had already concluded the sale of the house prior to the rehabilitation work being done, so it was doubly magic for me. In this way I was, through Simone's capable agency, getting to make a final contribution to the uniqueness of the Savage bungalow - while being on the way out the door! This was entirely special, and a fitting consummation of the relationship I had enjoyed with this spellbinding building for more than thirty-five years. The only thing I regret about the experience I've had here is having to actually bring it to an end. But in life, perhaps it doesn't get any better than that.
 |
| Conditioning the clouds to mimic smoke effects |
 |
| Panel conditioned to better mimic the effect of tobacco smoke |
I have been most fortunate in my time here to work with so many skilled individuals, without whom the Savage bungalow would not have been restored as remarkably as it has been. I want to share this with them now, as it's been an honour to have the opportunity of working with them all. Thank you all so much for your skill, hard work and dedication to craft, from the bottom of my heart!
No comments:
Post a Comment